Visualizing Wireless Sensor network data on bytebeam cloud using Bytebeam SDK for Arduino
Learn creating wireless sensor network using Sensor nodes and ESP32 gateway and visualizing sensor data in Bytebeam cloud
What is a wireless sensor network?
A wireless sensor network (WSN) is a collection of low-power wireless sensor nodes. These wireless sensor nodes contribute to making a sensor network to monitor physical or environmental conditions. These nodes communicate with each other through wireless communication channels and form a network to perform collaborative sensing tasks.
WSNs have various applications and can contribute to various use cases like
- Environmental monitoring
- industrial automation and analysis
- surveillance
- Healthcare
- Agriculture
and many more...
In this guide, we will create an application to form a wireless sensor network. We will be using ESP32 for this application.
Building Low-Power Wireless Sensor Network using ESP-Now
ESP32 uses its proprietary protocol known as ESPNow to establish seamless communication between two ESP32 devices. ESP Now is a peer-to-peer protocol, meaning it does not require a traditional network infrastructure, such as a Wi-Fi router or an access point. Instead, ESP Now allows two or more devices to communicate directly with each other without the need for an intermediary.
In this application, we will establish point-to-point communication between the ESP32 gateway and ESP32-based sensor nodes. This can be accomplished using the following easy steps
- Setting up the Bytebeam cloud console: We will be setting up a new project on the Bytebeam cloud console.
- Provisioning ESP32 Gateway: We will provision ESP32 Gateway using provisioning JSON.
- Configuring ESP32 Gateway: We will create an ESP32 gateway to receive sensor node messages using the ESP Now protocol and send the data to the Bytebeam cloud.
- Configuring ESP32 Sensor Node: We will go through configuring ESP32 as a slave device and send sensor data using ESP Now.
- Data visualization on the Bytebeam cloud console: We will explore the data visualization tools by Bytebeam and learn how to view and analyze data from the connected Arduino device in real-time.
So let's get started
Hardware Requirements
- ESP 32 dev module (2 for sensor node and 1 for gateway)
- SHT35 temperature and humidity sensors (two for each sensor node)
Getting Started with ByteBeam Cloud
Firstly, you need to create an account on Bytebeam Cloud (cloud.bytebeam.io). In case you already have an account with Bytebeam Cloud then you can proceed further with this guide or else follow Getting started with Bytebeam cloud.
Creating a new project
Login to your Bytebeam account to access the cloud console. Now, create a New Project and give it a name. I have given it the name “esp32wsn”. In the next screen, you will be asked to select the project. Select the newly created project and proceed further

Provisioning a new device
Click on Create Device button to provision a new device to Bytebeam cloud. And hit Submit.


- As you hit submit in the prompt. A new JSON file will be downloaded which contains the authentication certificate, broker, device_id, and project id. You need to save this file in the ESP file system. We will talk about this in a later section. The JSON will look like this.
{
 "project_id": "****",
 "broker": "******",
 "port": 8883,
 "device_id": "**",
 "authentication": {
      "ca_certificate":*"*********",
      "device_certificate": "**********",
      "device_private_key": "***********"
      }
}
Setting up ByteBeam SDK for Arduino
ByteBeam provides an SDK for Arduino to connect to the ByteBeam cloud platform. This guide assumes that you have a fair understanding of Arduino and that you have already set up Arduino on your machine. In case you haven’t done this you should follow Arduino-esp32 Getting Started Guide before going further.
Next, you can follow Getting started with Bytebeam Part 1 to install the Bytebeam Arduino library from Arduino Library Manager.
Provision ESP32 Gateway with device config data
Earlier in this guide, we had provisioned a new device in the bytebeam cloud console and downloaded a JSON file. We need to flash this file to the ESP32 file system called SPIFFS to connect our device to the cloud.
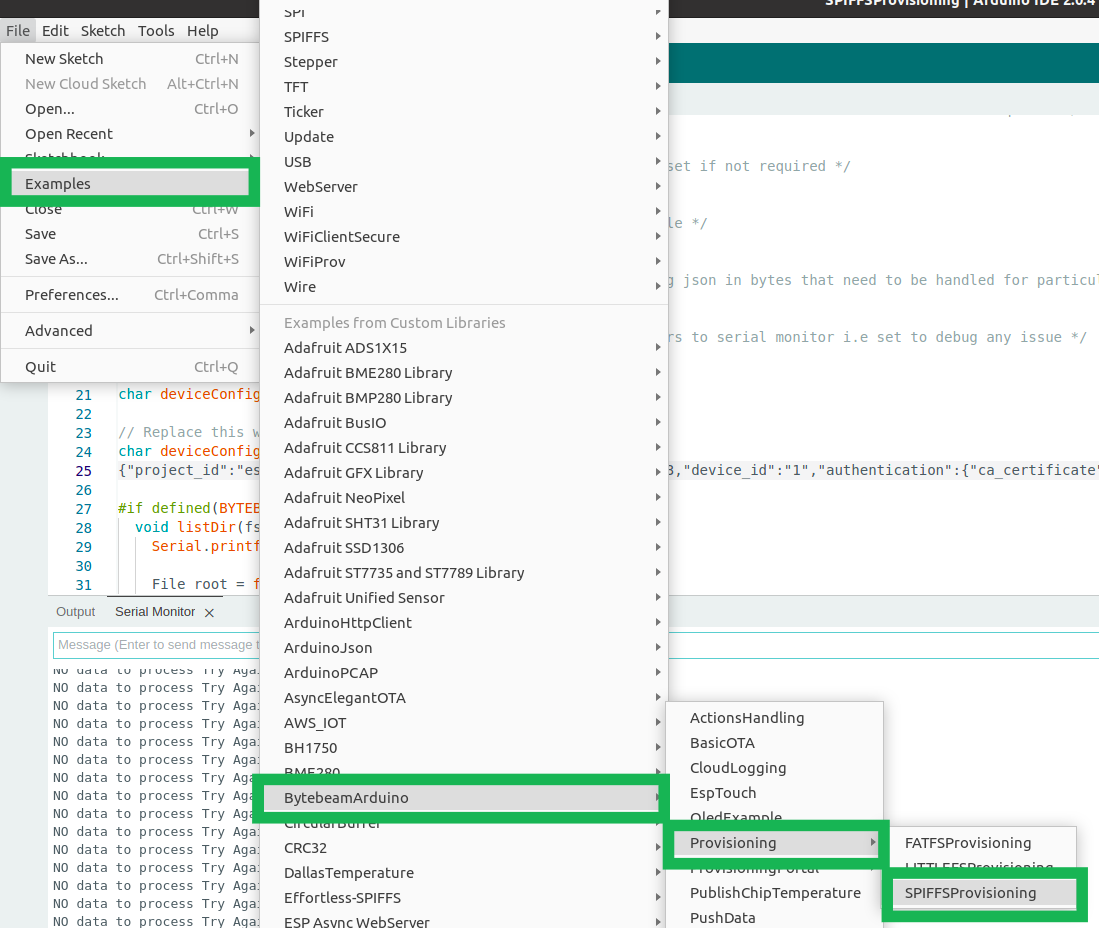
- To provision your ESP32 device, Open Arduino and navigate to File->Examples->BytebeamArduino->Provisioning->SPIFFSProvisioning. For the scope of this guide, we will do SPIFFS provisioning
- Now copy the content of your downloaded JSON and paste it into the code at deviceConfigWriteStr
- Now upload your example
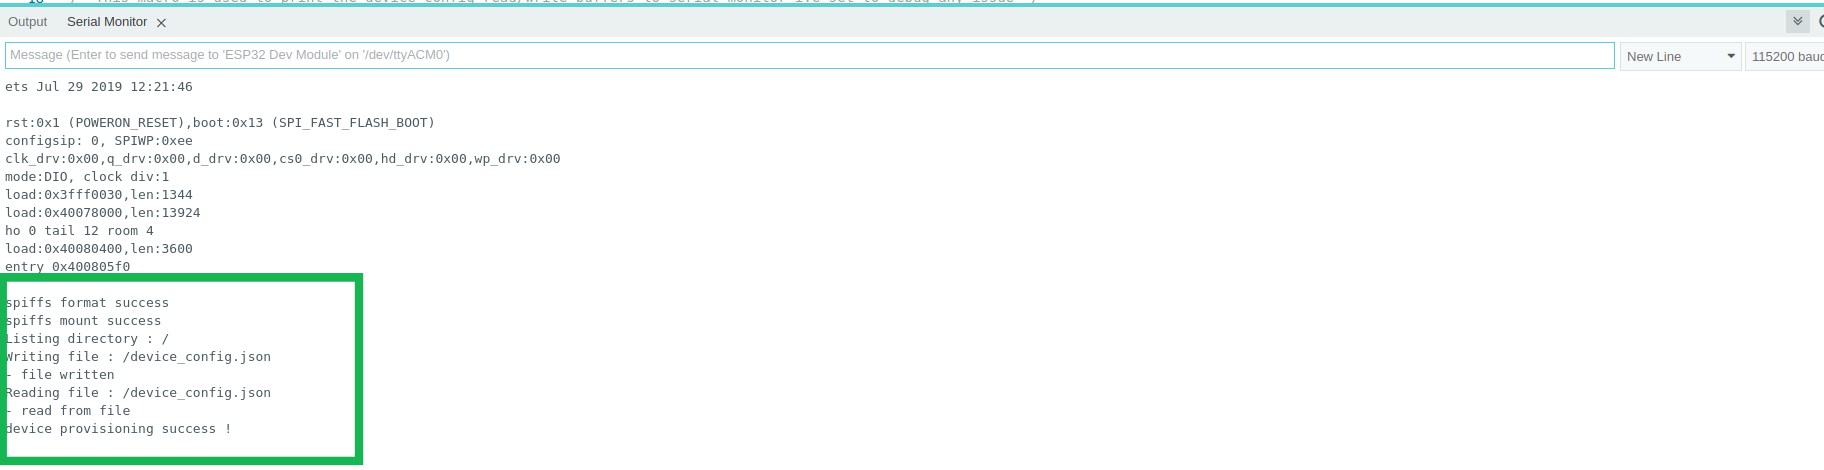
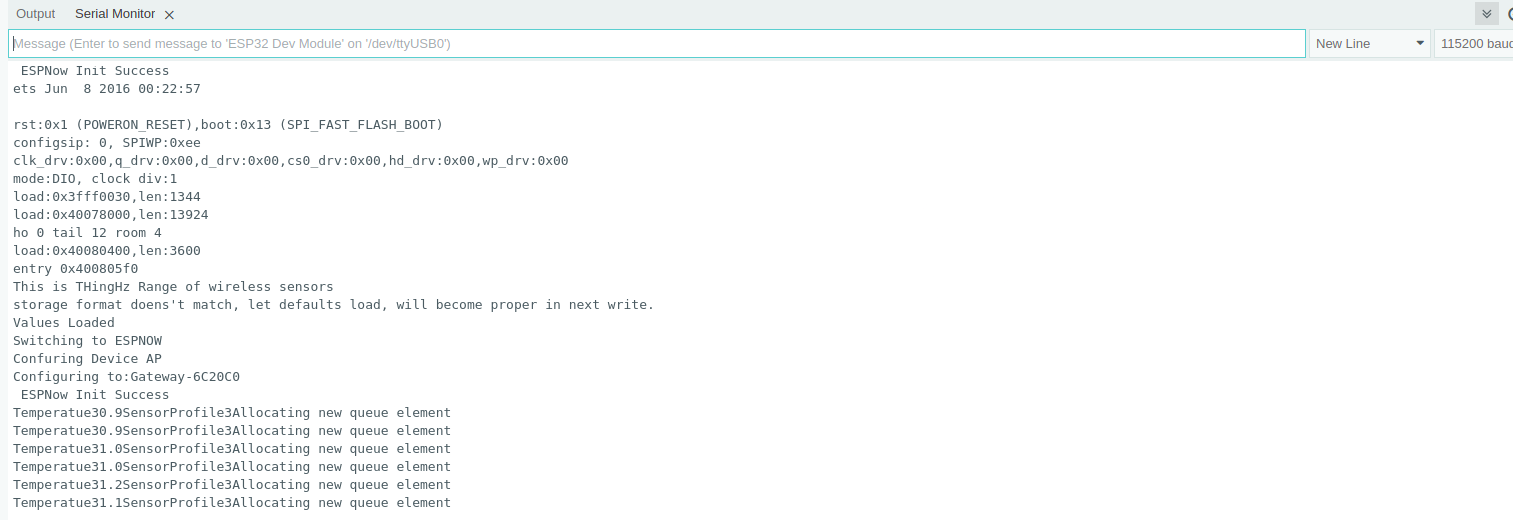
- Next Open Arduino Serial Monitor
- In the Serial monitor, you can see that device has been successfully provisioned.
// Replace this with your device config json in the same format
char deviceConfigWriteStr[DEVICE_CONFIG_STR_LENGTH] = R"(
{
    "project_id": "demo",
    "broker": "cloud.bytebeam.io",
    "port": 8883,
    "device_id": "1",
    "authentication": {
        "ca_certificate": "-----BEGIN CERTIFICATE-----***********************ca certificate*********************************-----END CERTIFICATE-----\n",
        "device_certificate": "-----BEGIN CERTIFICATE-----******************************client certificate*********************-----END CERTIFICATE-----\n",
        "device_private_key": "-----BEGIN RSA PRIVATE KEY-----****************************private key*******************************----END RSA PRIVATE KEY-----\n"
    }
}
)";

Setting up ESPNow nodes and gateway
In this section of the blog, we will walk through the process of setting up ESPNow sensor nodes and a gateway to create a wireless sensor network using ESP32 microcontrollers and SHT35 temperature and humidity sensors. This network will enable us to collect temperature and humidity data from sensor nodes and relay it to the Bytebeam cloud platform. To get started with this
- Clone wsn_bytebeam repository from GitHub using the clone command. This repository contains code for the gateway and sensor node.
git clone https://github.com/vbshightime/wsn_bytebeam.gitBefore we start coding, let's wire up the SHT35 sensors to the ESP32 sensor nodes. SHT35 comes with an I2C interface. The connection of ESP32 and SHT35 is shown in the diagram below

Setting up the ESPNow Sensor Nodes
To set up ESP Now Sensor Node. Grab your sensor node setup and go through the following steps.
- Navigate to wsn_bytebeam repository and open the sensor_node folder
- Here you will find the code for the sensor node.
- Sending data from sensor nodes to the gateway involves 3 steps. First is initialising ESP Now. The second is Scanning for available gateway. The third is sending data to the following gateway. Let's look into these steps in detail.
- First, initialise a peer object to store information about available peers or gateways
esp_now_peer_info_t gateway;- Create a function to initialise esp Now
// Init ESP Now with fallback
void InitESPNow() {
  WiFi.disconnect();
  if (esp_now_init() == ESP_OK) {
    Serial.println("ESPNow Init Success");
  }
  else {
    Serial.println("ESPNow Init Failed");
    ESP.restart();
  }
}- Now in the next step create a function to scan for available gateways.
// Scan for gateways in AP mode
void ScanForGateway() {
  int16_t scanResults = WiFi.scanNetworks(false, false, false, 300, ESPNOW_CHANNEL); // Scan only on one channel
  // reset on each scan
  bool gatewayFound = 0;
  memset(&gateway, 0, sizeof(gateway));

  Serial.println("");
  if (scanResults == 0) {
    Serial.println("No WiFi devices in AP Mode found");
  } else {
    Serial.print("Found "); Serial.print(scanResults); Serial.println(" devices ");
    for (int i = 0; i < scanResults; ++i) {
      // Print SSID and RSSI for each device found
      String SSID = WiFi.SSID(i);
      int32_t RSSI = WiFi.RSSI(i);
      String BSSIDstr = WiFi.BSSIDstr(i);
      delay(10);
      // Check if the current device starts with `Gateway-`
      if (SSID.indexOf("Gateway-") == 0) {
        // Get BSSID => Mac Address of the Gateway
        int mac[6];
        if ( 6 == sscanf(BSSIDstr.c_str(), "%x:%x:%x:%x:%x:%x",  &mac[0], &mac[1], &mac[2], &mac[3], &mac[4], &mac[5] ) ) {
          for (int ii = 0; ii < 6; ++ii ) {
            gateway.peer_addr[ii] = (uint8_t) mac[ii];
          }
        }

        gateway.channel = ESPNOW_CHANNEL; // pick a channel
        gateway.encrypt = 0; // no encryption

        gatewayFound = 1;
        // we are planning to have only one gateway in this example;
        // Hence, break after we find one, to be a bit efficient
        break;
      }
    }
}- In the next step create a function to send sensor data to the associated gateway.
void sendData() {
  readSensorTH();
  DEBUG_PRINTF("Temp= %.1f, battery= %d, humidity=%.1f, HW_REV=%d, sensor_profile=%d\n", SensorTempHumid.temperature, SensorTempHumid.batteryPercentage, SensorTempHumid.humidity,SensorTempHumid.hwRev,SensorTempHumid.sensorProfile);
  const uint8_t *peer_addr = gateway.peer_addr;
  esp_err_t result = esp_now_send(peer_addr, (uint8_t*)&SensorTempHumid, sizeof(SensorTempHumid));
  Serial.print("Send Status: ");
  if (result == ESP_OK) {
    Serial.println("Success");
  }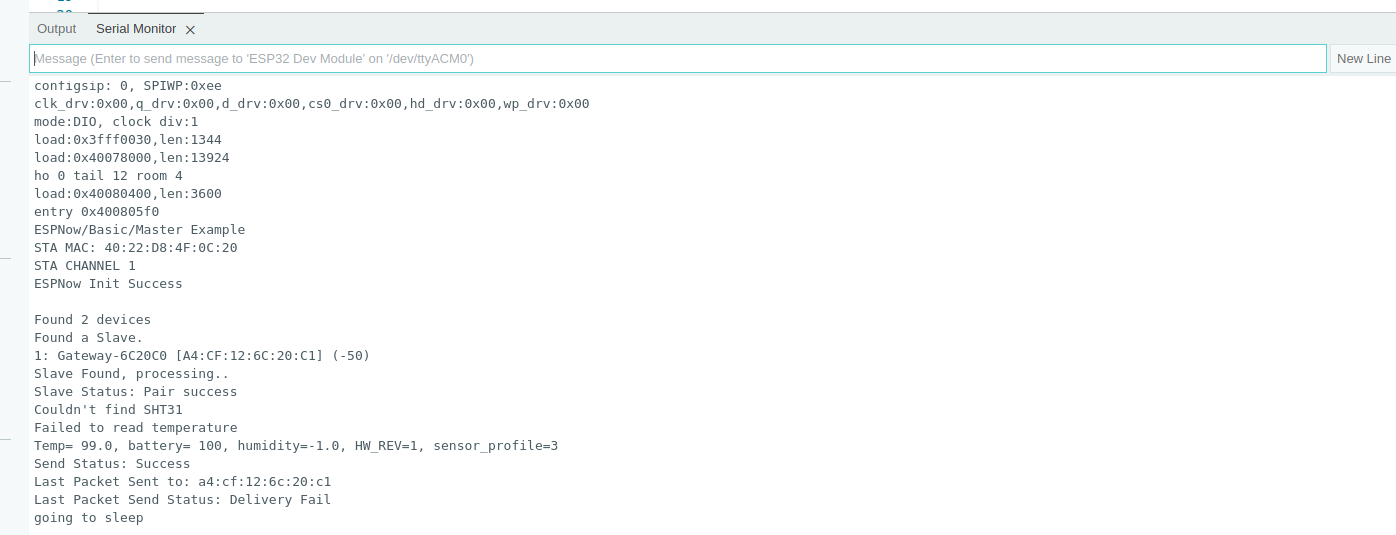
}- In this setup register a callback to get the status of the transmitted packet
esp_now_register_send_cb(OnDataSent);void OnDataSent(const uint8_t *mac_addr, esp_now_send_status_t status) {
char macStr[18];
snprintf(macStr, sizeof(macStr), "%02x:%02x:%02x:%02x:%02x:%02x",
mac_addr[0], mac_addr[1], mac_addr[2], mac_addr[3], mac_addr[4], mac_addr[5]);
Serial.print("Last Packet Sent to: "); Serial.println(macStr);
Serial.print("Last Packet Send Status: "); Serial.println(status == ESP_NOW_SEND_SUCCESS ? "Delivery Success" : "Delivery Fail");
}- Now flash the code to your sensor node
Setting up the ESPNow Gateway
To set up ESP Now Gateway. Grab your ESP32 and go through the following steps.
- Navigate to wsn_bytebeam repository and open the gateway folder
- Here you will find the code for the gateway.
- Here Gateway performs two tasks. First is receiving data from the sensor node and processing it. Second, is sending data from the sensor node to the Bytebeam cloud
- Receiving data from sensor nodes to the gateway involves 3 steps. The first is setting up the ESP gateway in discoverable mode by configuring it as AP. The second is initialising ESP Now. The third is receiving data from the sensor nodes. Let's look into these steps in detail.
- Firstly, create a function to configure the ESP32 gateway in AP mode to make it discoverable by nearby sensor nodes.
bool configESPNowDeviceAP() {
  WiFi.mode(WIFI_AP_STA);
  DEBUG_PRINTLN("Confuring Device AP");
  String Prefix = AP_MODE_SSID;
  uint8_t mac[6];
  String macStr = getLast3ByteMac(mac,false);
  String ssid = Prefix + macStr;
  DEBUG_PRINTLN("Configuring to:"+ssid);
  bool result = WiFi.softAP(ssid.c_str(), "", ESPNOW_CHANNEL, 0);
  if (!result) {
    DEBUG_PRINTLN("AP Config failed.");
    return false;
  }
  return true;
}- Now, Initialize ESP Now
bool switchToESPNowGateway()
{
  configESPNowDeviceAP();
  WiFi.disconnect();
  int ESPNow_err = esp_now_init();
  if (ESPNow_err != ESP_OK) {
    DEBUG_PRINTLN("ESPNow Init failed");
    return false;
  } else {
    DEBUG_PRINTLN(" ESPNow Init Success");
  }
  return true;
}- Next, Create a callback to receive messages for sensor nodes
esp_now_register_recv_cb(OnDataRecv);void OnDataRecv(const uint8_t *mac_addr, const uint8_t *data, int data_len) {
char macStr[18];
snprintf(macStr, sizeof(macStr), "%02x:%02x:%02x:%02x:%02x:%02x",
mac_addr[0], mac_addr[1], mac_addr[2], mac_addr[3], mac_addr[4], mac_addr[5]);
if (data_len < sizeof(SensorPayloadTH))
{
DEBUG_PRINTLN("Bad data from espnow");
return;
}
SensorPayloadTH *payload = (SensorPayloadTH*)data;
DEBUG_PRINTF("Temperatue%.1f", payload->temperature);
DEBUG_PRINTF("SensorProfile%d", payload->sensorProfile);
deviceState.enqueSensorPayload(String(macStr).c_str(), payload);
}- The second task of the ESP32 gateway is to process and relay sensor node data to the Bytebeam cloud platform. To do that first include Bytebeam Arduino header
#include <BytebeamArduino.h>- Then begin the Bytebeam client
Bytebeam.begin()- Next, Create a function to publish sensor data to the Bytebeam cloud
bool publishToBytebeam(DeviceState &devState){
   bool isSent = false;
   SensorPayload *payload = nullptr;
   while (devState.hasUnprocessedTelemetry()){
          Bytebeam.loop();
          DEBUG_PRINTLN("hasUnprocessedTelemetry");
          PayloadQueueElement *telemeteryElement = devState.telemetryQueue.pop();
          payload = telemeteryElement->_payload;
          String preparedPayload;
          preparedPayload = createPayload(telemeteryElement);
          isSent = Bytebeam.publishToStream(tempHumid, preparedPayload.c_str());
          if (!isSent)
        {
          DEBUG_PRINTLN("Could not send to bytebeam");
          return isSent;
        }
         delete telemeteryElement;
      }

  return isSent;
}
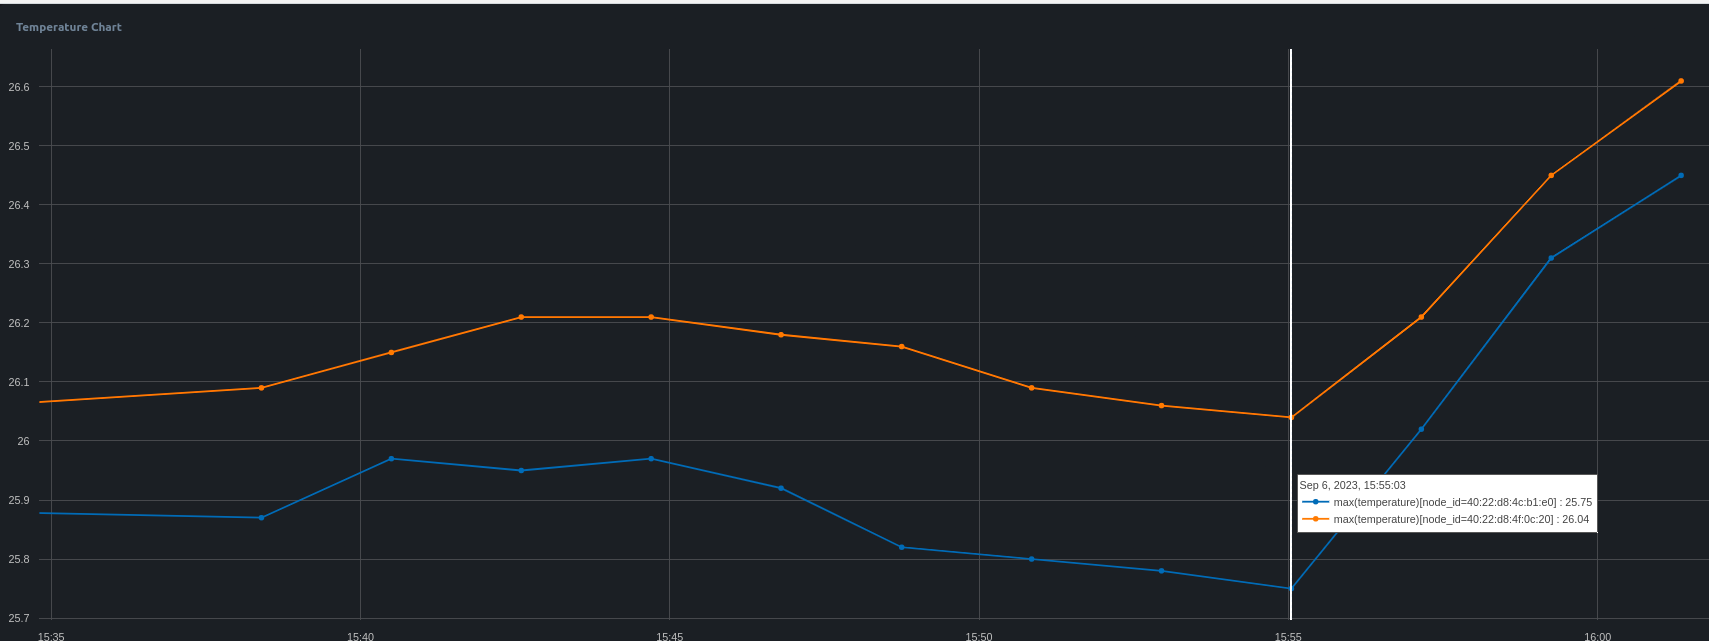
Data Visualization in Bytebeam Cloud
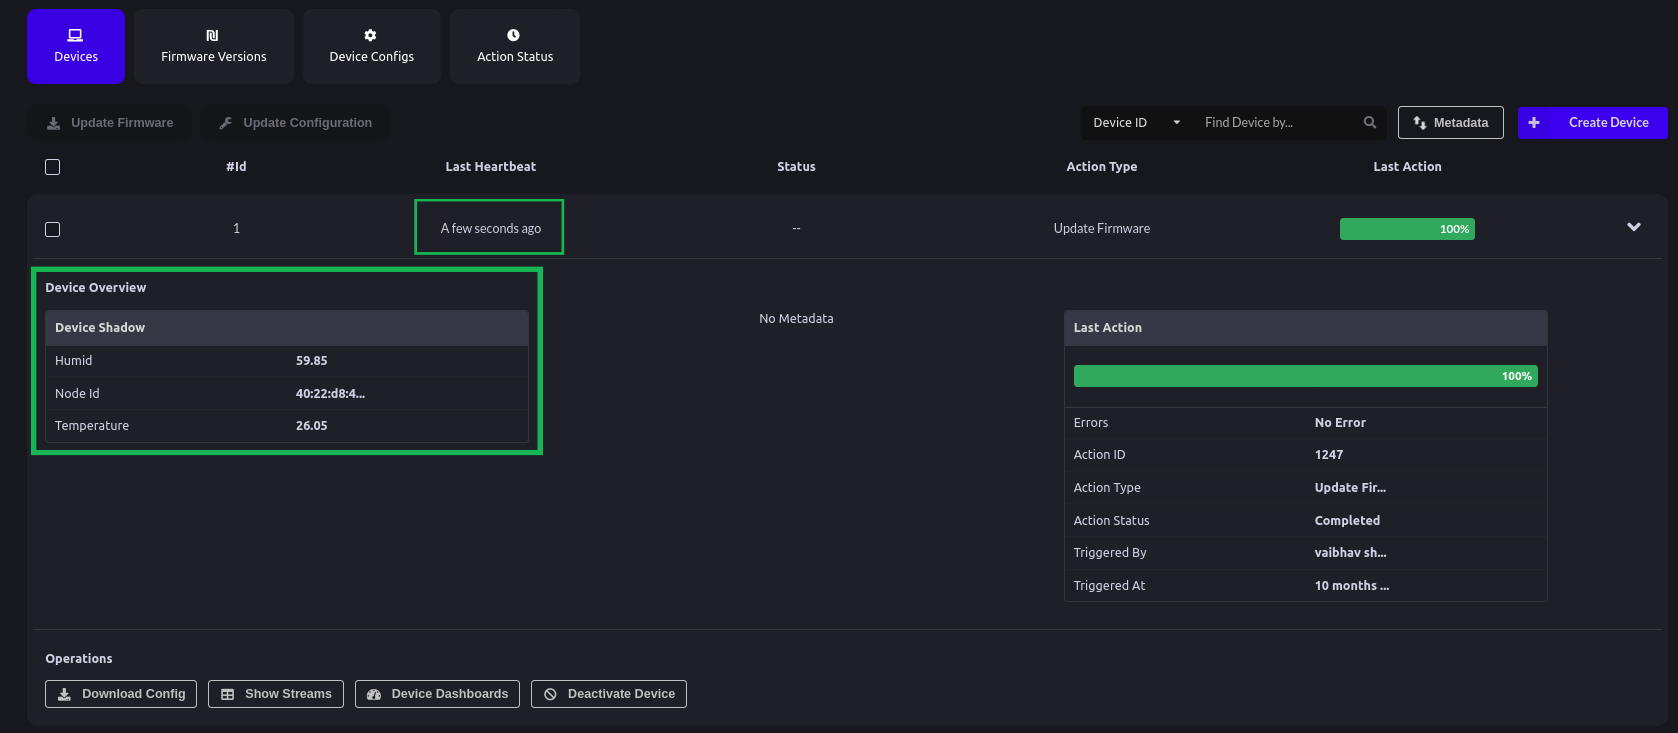
- After a successful connection of ESP32 with Bytebeam Cloud, we can see the recent device shadow and heartbeat on the cloud console.
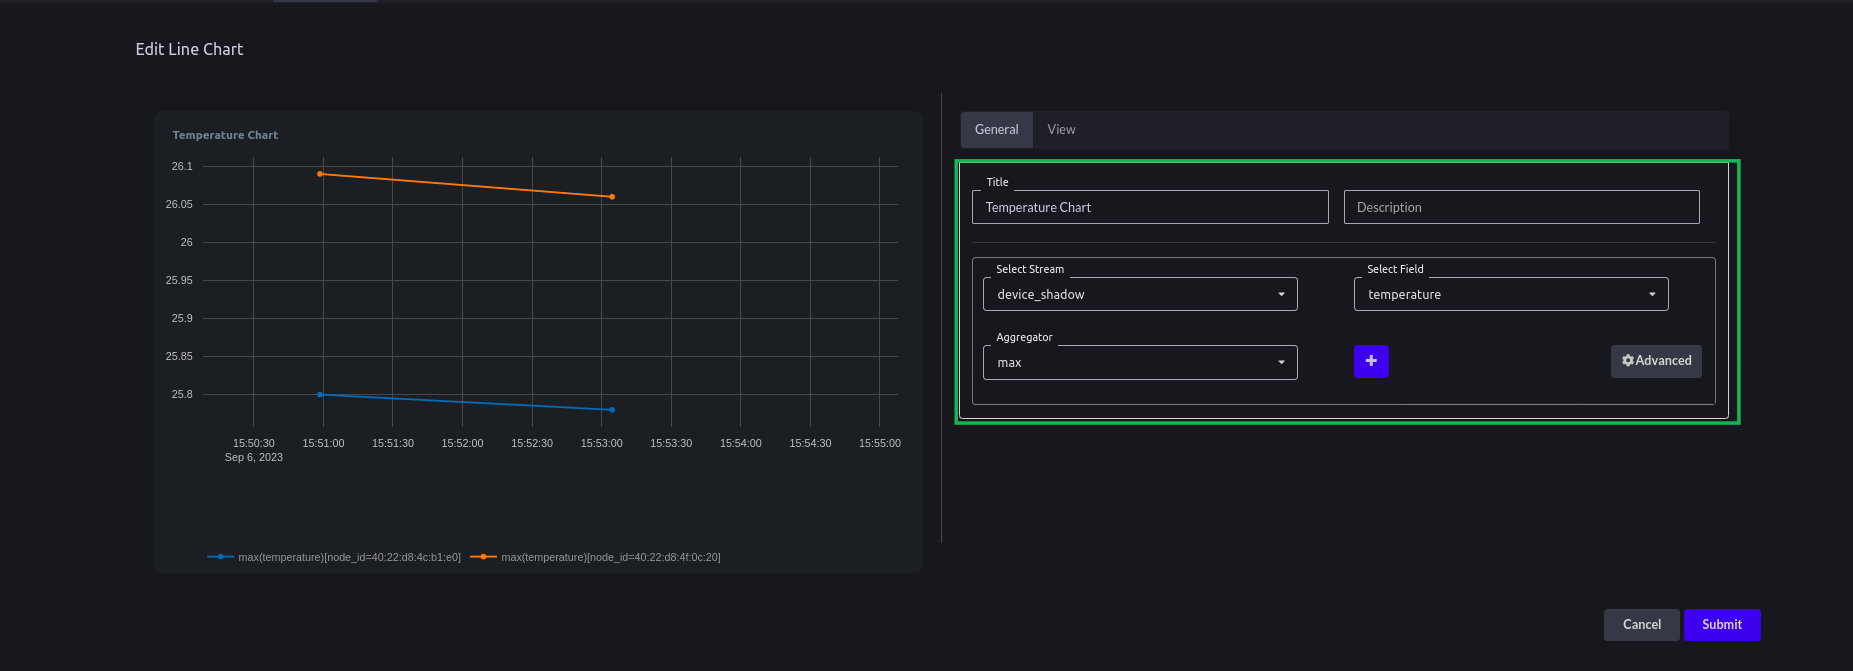
- Next, Create a dashboard and choose a panel of your choice. We have chosen a line chart for visualisation.
- Go to a line chart. Give a title to your line chart. Select Stream "device_Shadow". Select field as "temperature". Aggregator as "max"
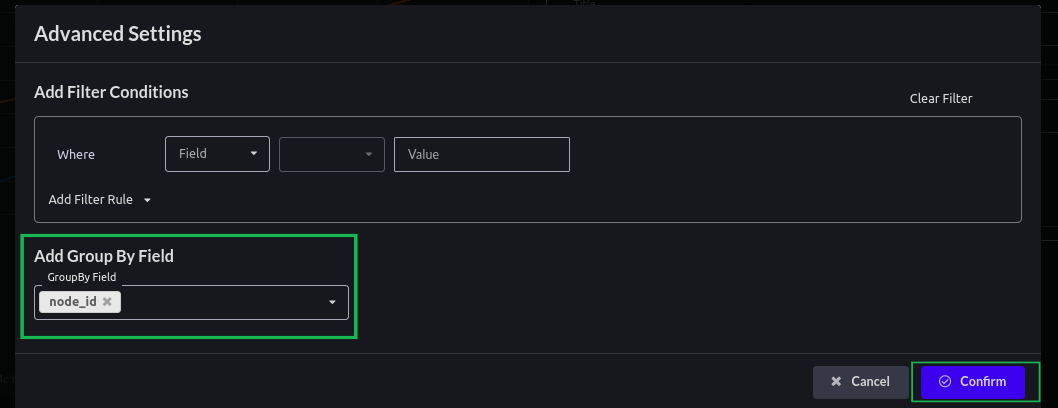
- For Advance settings Click on Advanced. Add node_id in Group by Field and hit Confirm
- Similarly, create a humidity chart as well.
- Create multiple visualizations for your dashboard

Conclusion
In conclusion, we've gone through advanced filtering in line charts. Through the lens of a practical use case involving a wireless sensor network, with ESP32 acting as the gateway and sensor node, we've demonstrated how this feature empowers you to harness the full potential of your data. Whether you're creating an edge IoT solution, wireless sensor networks, or countless other applications, Bytebeam's advanced filtering capabilities offer you a strategic advantage.
Bytebeam offers a comprehensive suite of features and tools to enhance your IoT and data management experience. Check out our data Visualization guide for creating interactive dashboards, OTA guide for remote updates and the Handling Action Guide for remote operations.
I hope you find this guide useful. As we continue to come up with more interesting tutorials and maker content, we invite you to explore Bytebeam further and see how our platform can empower your projects.
Stay tuned!


.png)
