Getting Started with ESP32 IDF and ByteBeam Part 3 - Handling Actions

Learn to create and handle actions on your IoT devices using Bytebeam cloud
Earlier in Part 1 and Part 2, we understood some basic concepts of bytebeam cloud that can be very helpful for your IoT application. In Part 1 we discussed device management and data visualization.
In Part 2 we performed over the air firmware update on our ESP32 device.
Within this article, we will be focusing on action handling using the Bytebeam cloud.
What are Actions
turn on your AC remotely so that you get a nice environment when you reach your home or turn off your lights remotely to save energy bills.
These are some examples of actions that you can add using the bytebeam cloud. An action has a command-response model. It contains a set of commands that can be used to perform tasks or operations and generates a response on completion. These actions become very handy when you want to control your IoT devices remotely.
How Bytebeam helps with Action Handling
Bytebeam offers this cool feature to create an action using simple steps. Next, we will guide you through the procedure to create an action using the bytebeam cloud and handle the action on your IoT device. Here in this tutorial, we will be adding action on Bytebeam cloud and handling action on ESP32
So let's get started.
Hardware Requirements
- ESP 32 dev module
Configuring actions in ESP32
To understand action we will toggle the state of ESP32 built-in led. We will write an action handler to receive action from the bytebeam cloud.
- Navigate to examples->action_handling -> main -> app_main.c
- Add an action handler using bytebeam_add_action_handler function. It contains the following arguments
- bytebeam_client: structure containing host, port, certificates and device id information
- handle_hello_world: handler function to toggle led
- hello_world: action name.
bytebeam_add_action_handler(&bytebeam_client, handle_hello_world, "hello_world");- Now flash and upload the example
Idf.py -p PORT flash monitorIn the next section, we will add "hello_world" action on the bytebeam cloud.
Adding action on bytebeam cloud
- Login to your bytebeam cloud account and go to the Device Management tab
- Here you can see preconfigured actions like Update Firmware and Update Configuration.

- To create a new action Click on the Settings tab and then navigate to Actions. Then click on Create Action to configure a new action.

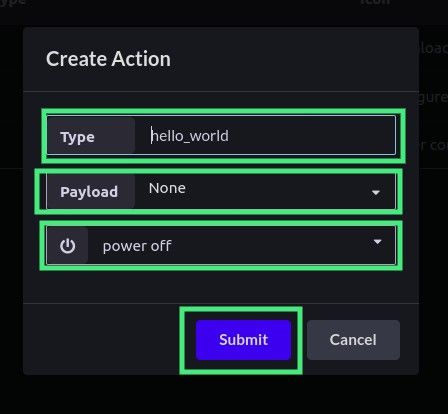
- On the next screen, you can see a Type edit text and a drop-down to select Icon.
- In Type edit text we need to write down the action name i.e. hello_world in our case. Earlier in Configuring actions in ESP32 section we created an action handler with hello_world as the action name.
- Select payload type as None.
- Then select an icon from the drop-down. We have selected power off icon for this example. You can choose any from the list. Then hit submit
- Now you can find newly created actions on the action list

Triggering an Action
We need to follow these easy steps to trigger an action:
- Navigate to the Devices tab under Device Management
- Click on the checkboxes to select the list of devices you want to trigger the Action
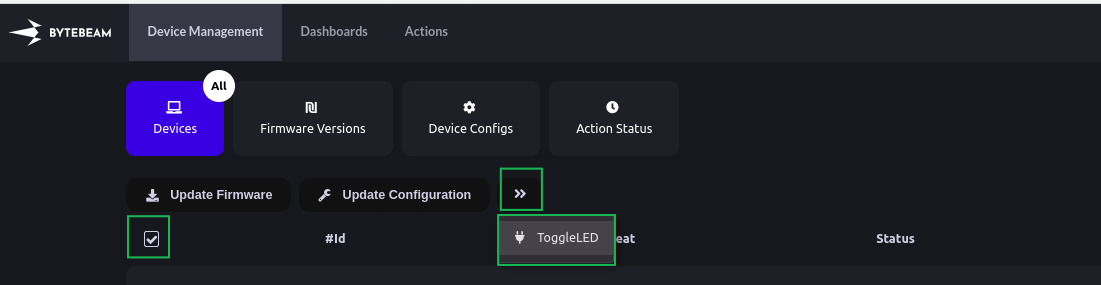
- Click on the Action button you want to trigger. In our case, we have selected a device with #id 1 and triggered 'Toggle Board Led' Action.
- In the Last Action column, you can see the Action status as Initiated and you can monitor the progress of the action from the progress bar

- The Action will be sent to the selected Devices now. If the device is offline when the Action is triggered, the system will retry sending Actions to the device every 5s.
- After successful execution of the action, the Action status will be charged to Completed.

Conclusion
Actions can be very handy in many use cases. I hope you find this guide useful. We will come up with more interesting tutorials and maker content. Stay tuned.


