Smart Solutions for Urban Gardeners: Automating Irrigation with Bytebeam
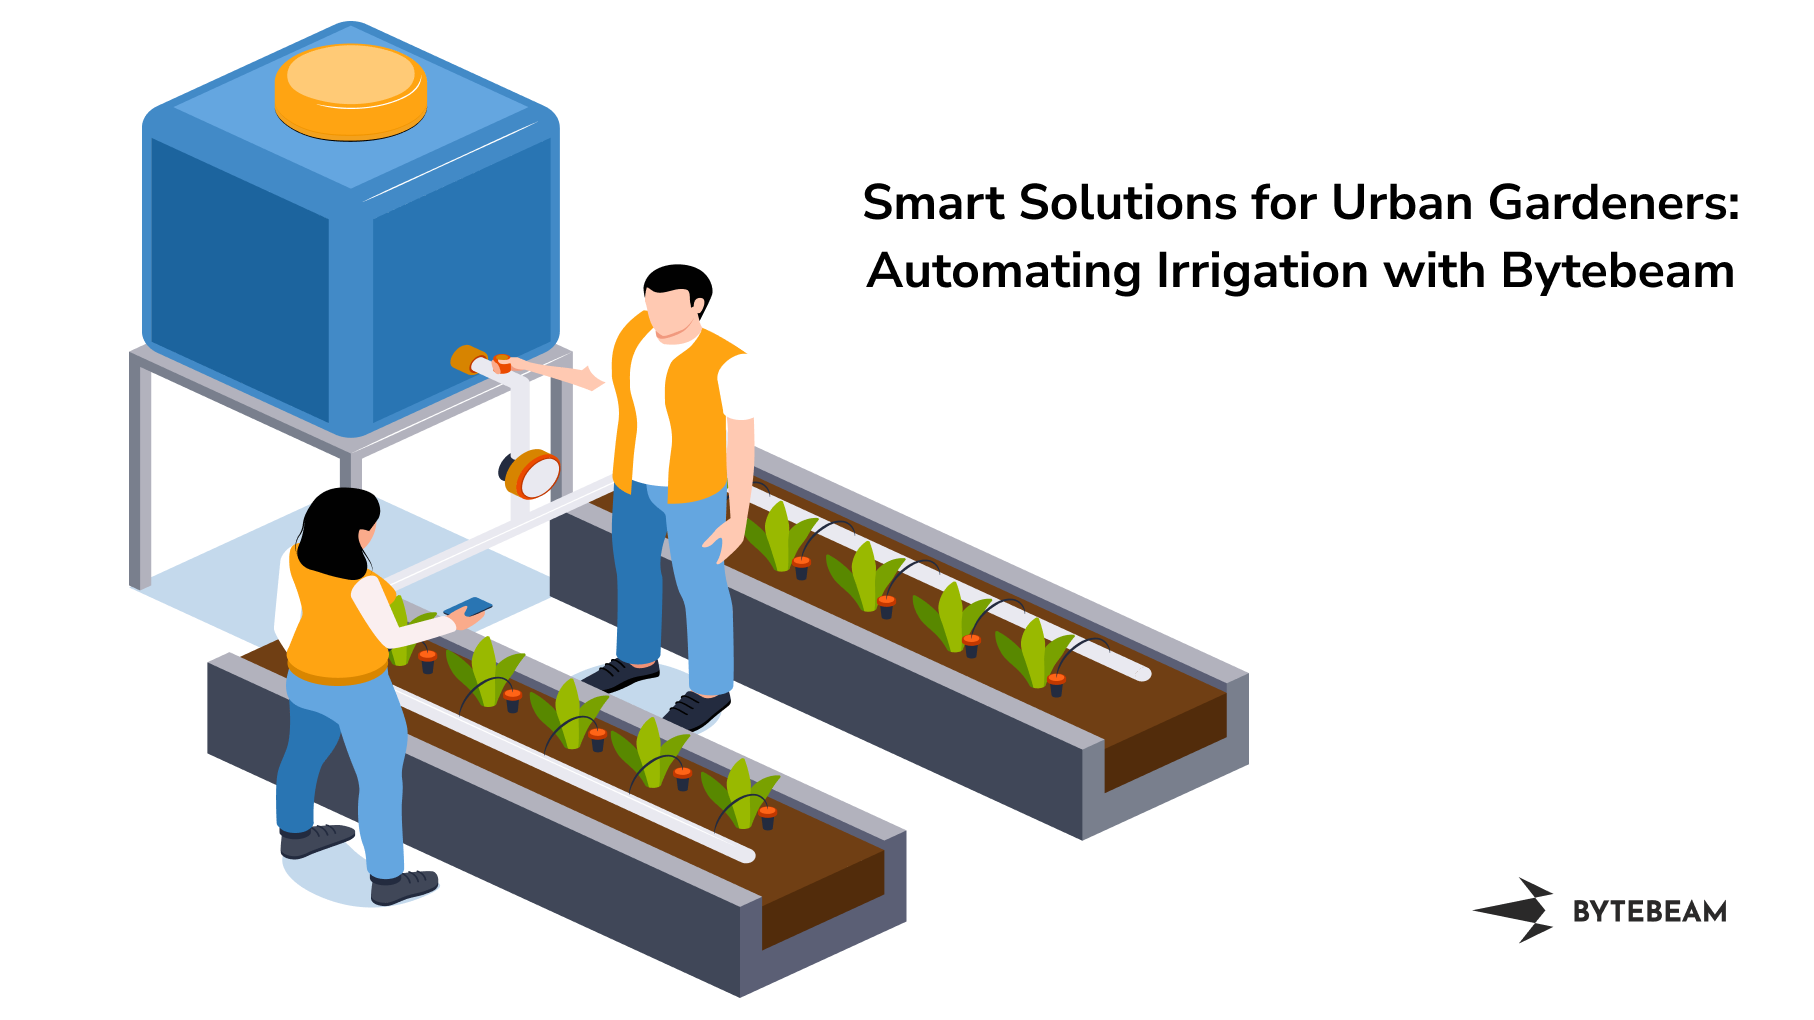
Learn to create a smart gardening solution using ESP32 and Bytebeam
In today's fast-paced urban lifestyle, the desire for lush greenery around us remains undiminished. Whether it's a charming balcony garden or a serene terrace garden, the appeal of nurturing plants and trees is undeniable. However, the hustle and bustle of city life often leaves us with insufficient time to cater to our green companions, particularly during long vacations.
Imagine this: you're off on a well-deserved holiday, sipping your favourite drink on a distant beach and exploring new horizons. Meanwhile, back at home, your plants are left parched, yearning for a drop of water. It's a dilemma faced by many urban gardeners - the struggle to balance a love for gardening with the demands of a hectic life.
I have faced it a lot and I guess there are many like me. So, to address this problem, I have created a solution to automate irrigation using Bytebeam. This solution helps you to water your plants with just one click of a button at any time from anywhere.
What to expect from this guide:
In this comprehensive blog post, we'll walk you through the step-by-step process of setting up this ingenious smart gardening solution using ESP32 and bytebeam. We will be demonstrating the following
- Setting up the Bytebeam cloud console: We will go through creating an account and setting up a new project on the Bytebeam cloud console.
- Setting Up ESP32: We will set up our drip irrigation system. Integrate it with ESP32 and relay to automate the irrigation system.
- Provisioning ESP32: We will provision ESP32 using provisioning JSON.
- Connecting an ESP32 to the Bytebeam platform: We will learn how to connect an ESP32 to the Bytebeam platform and how to send data from the device to the cloud.
- Triggering action from the Bytebeam cloud console: We will set up actions and trigger action from Bytebeam Cloud to irrigate our plants.
Hardware and Software Specifications
Hardware Specification
- ESP32
- Drip irrigation system
- 5V 1 Channel Relay
- Submersible Water pump
Software Specification
Setting Up Bytebeam Cloud
If you are new to the Bytebeam IoT cloud platform. Go through the getting started with Bytebeam tutorial to deep dive into the concepts of Bytebeam. I hope you found the getting started guide useful and are aware of the concepts of Bytebeam Cloud.
- First, create a new device for that got to the Device Management panel and click on Create device
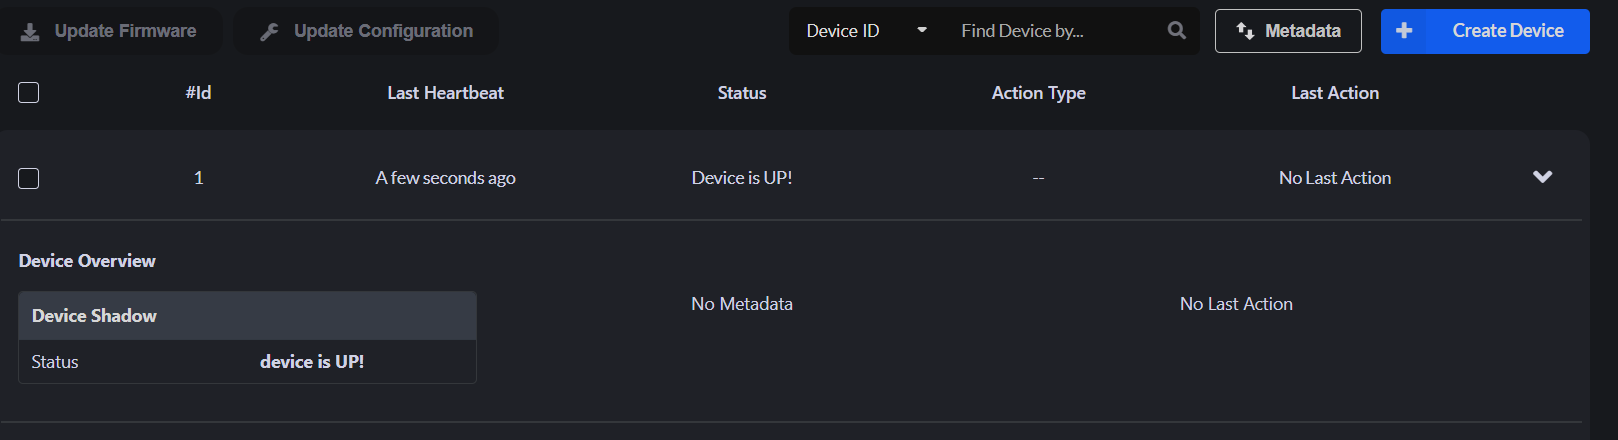
- As you hit submit in the prompt. A new JSON file will be downloaded which contains the authentication certificate, broker, device_id, and project id. You need to save this file in the ESP file system. We will talk about this in a later section.

- The JSON will look like this.
{
 "project_id": "****",
 "broker": "******",
 "port": 8883,
 "device_id": "**",
 "authentication": {
      "ca_certificate":*"*********",
      "device_certificate": "**********",
      "device_private_key": "***********"
      }
}
Setting Up ESP32
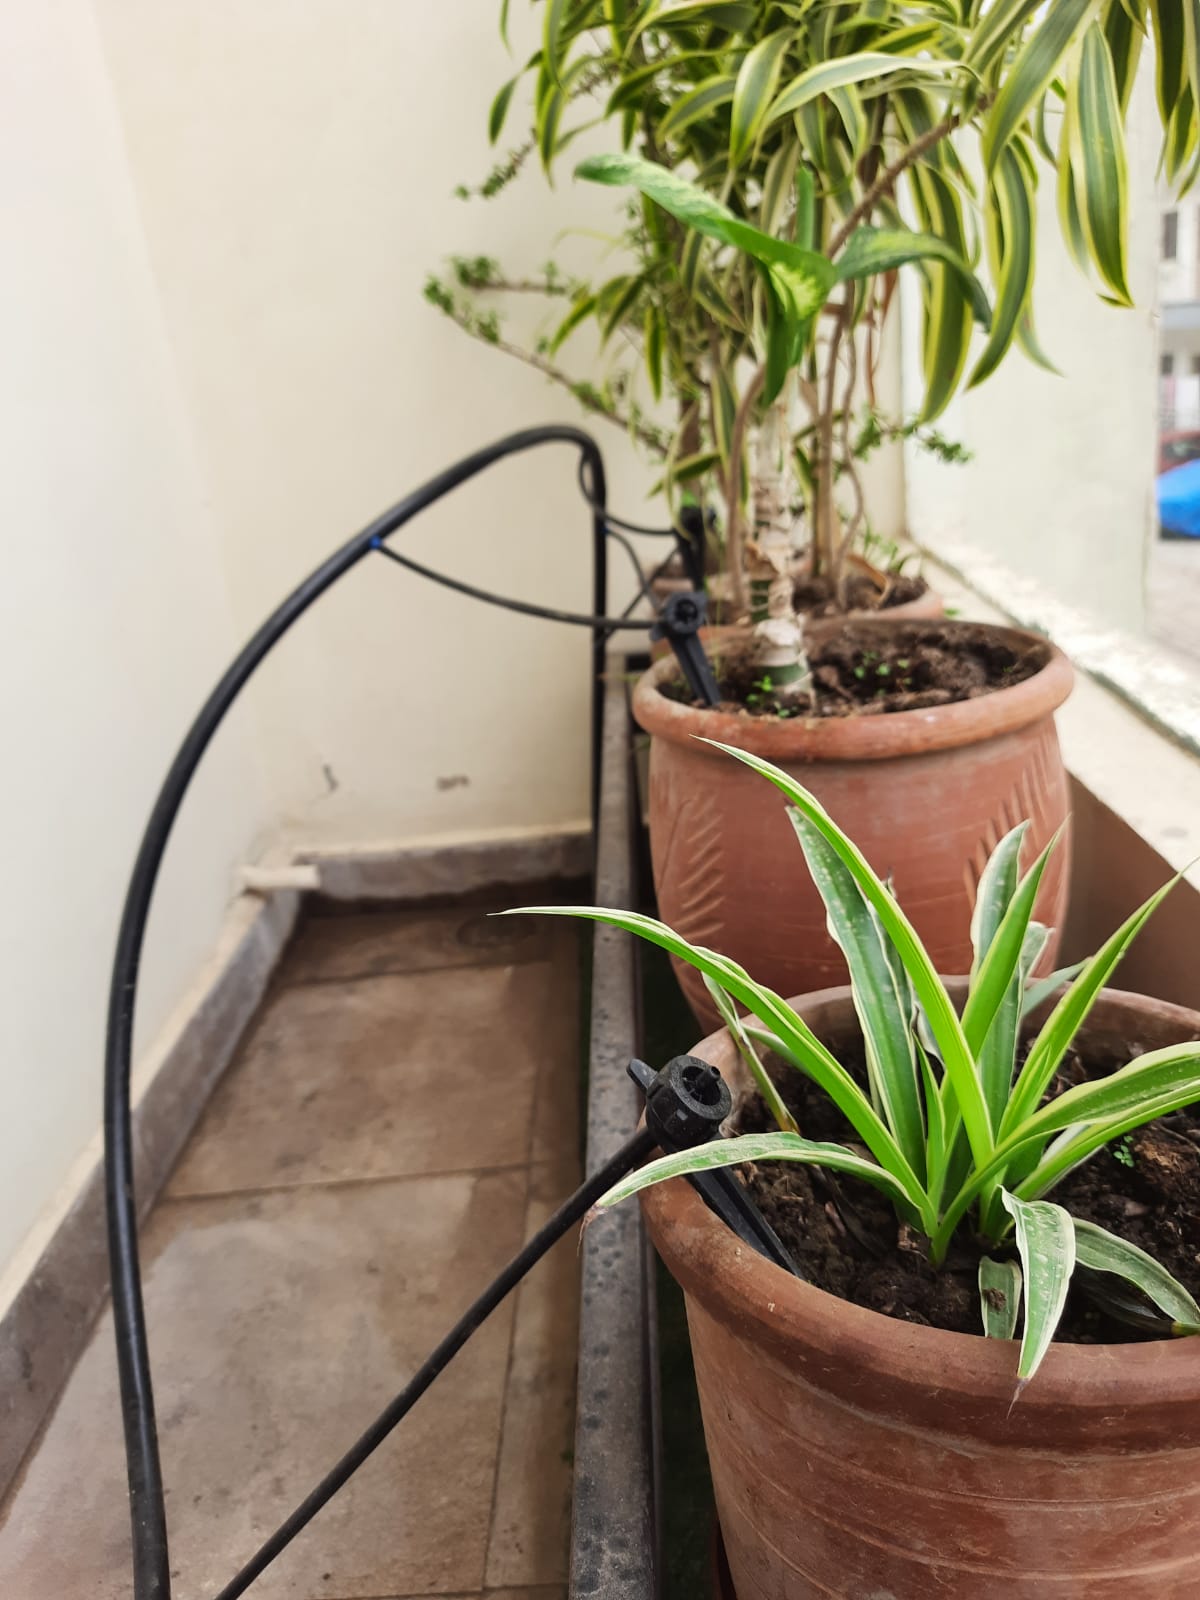
First, we need to setup our drip irrigation system. Most of the product comes with a setup guide to install the system. My setup looks like this
This guide assumes that you are familiar with Arduino and had your ESP32 setup on Arduino IDE. The next steps will guide you through the project setup and hardware connection
Hardware connection
First, get your Relay. Connect the VCC and GND pins of the relay with VIN and GND of ESP32. connect the IN pin of relay with GPIO 15 (It could be any, for the scope of this guide we have chosen this) of ESP32
Now connect the COM screw-terminal of the relay with mains and NO screw-terminal of the relay with the water motor.
Project Setup
Firstly to get started with Bytebeam SDK for Arduino, you need to install the Bytebeam Arduino library. This can be downloaded from the Arduino library manager. To get more understanding of Bytebeam Arduino installation and provisioning of ESP32 go through our 3-part tutorial series:
Configuring irrigating plant action ion ESP32
- Clone SmartGarden repository from GitHub.
- Open the SmartGarden project and upload it to ESP32
- Once the project has been flashed. Open the serial Monitor to debug the project.
Code Overview
- In src.ino. First, setup your relay pin.
pinMode(RELAY_PIN, OUTPUT);
digitalWrite(RELAY_PIN,RSTATE.isIrrigating);- Then, create a function to toggle the relay operation.
// function to setup the predefined led
int toggleRelay(char *args, char *actionId)
{
  Serial.printf("*** args : %s , actionId : %s ***\n", args, actionId);
  if (RSTATE.isLightOn ? Serial.println("Irrigating plants") : Serial.println("Irrigation off"));
  RSTATE.isIrrigating = !RSTATE.isIrrigating;
  digitalWrite(RELAY_PIN, RSTATE.isIrrigating);
  RSTATE.isIrrigating = digitalRead(RELAY_PIN);
  Bytebeam.publishActionCompleted(actionId);
  return 0;
}- Then publish the status to Bytebeam cloud.
bool publishToDeviceShadow()
{
  static int sequence = 0;
  const char *payload = "";
  String deviceShadowStr = "";
  StaticJsonDocument<1024> doc;

  char deviceShadowStream[] = "device_shadow";

  sequence++;
  unsigned long long milliseconds = getEpochTime();

  JsonArray deviceShadowJsonArray = doc.to<JsonArray>();
  JsonObject deviceShadowJsonObj_1 = deviceShadowJsonArray.createNestedObject();
  DEBUG_PRINTLN(milliseconds);

  deviceShadowJsonObj_1["timestamp"] = milliseconds;
  deviceShadowJsonObj_1["sequence"] = sequence;
  if (!RSTATE.isIrrigating)
  {
    deviceShadowJsonObj_1["Status"] = "Irrigating plants";
  }
  else
  {
    deviceShadowJsonObj_1["Status"] = "irrigation off";
  }

  serializeJson(deviceShadowJsonArray, deviceShadowStr);
  payload = deviceShadowStr.c_str();
  Serial.printf("publishing %s to %s\n", payload, deviceShadowStream);
  return Bytebeam.publishToStream(deviceShadowStream, payload);
}
Configuring and Triggering action from Bytebeam Cloud
In this section, we will be adding action on bytebeam cloud and we will be triggering actions from bytebeam cloud
Adding action on bytebeam cloud
- Login to your bytebeam cloud account and go to the Device Management tab
- Here you can see preconfigured actions like Update Firmware, Update Configuration, and Push File.
- To create a new action Click on the Settings tab and then navigate to Actions. Then click on Create Action to configure a new action.
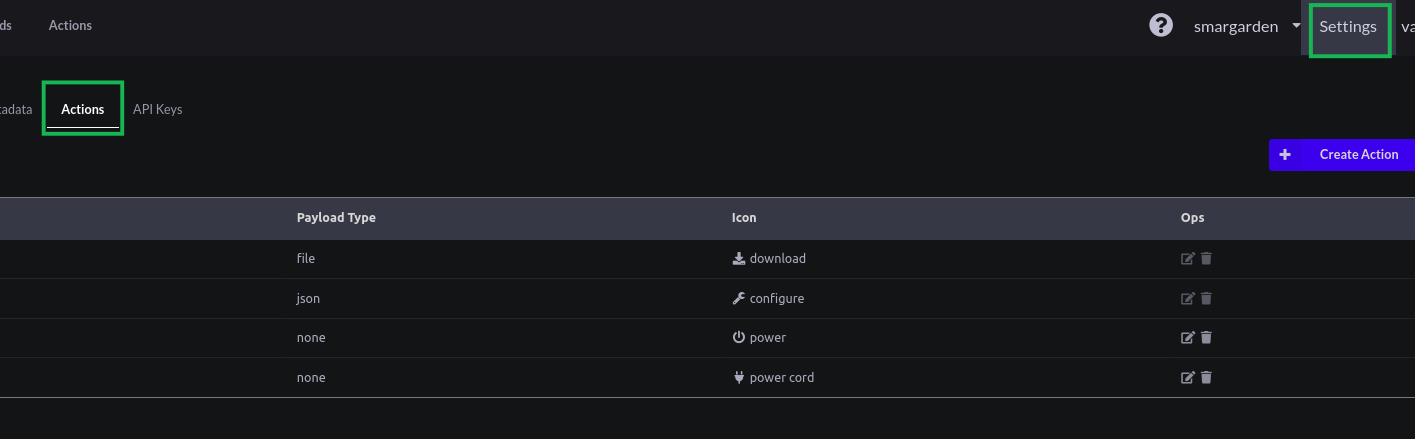
- On the next screen, you can see a Type edit text and a drop-down to select Icon.
- In Type edit text we need to write down the action name i.e. ToggleLED in our case. Earlier in Configuring actions in the ESP32 section we created an action handler with ToggleLED as the action name.
- Then select an icon from the drop-down. We have selected power cord icon for this example. You can choose any from the list. Then hit submit
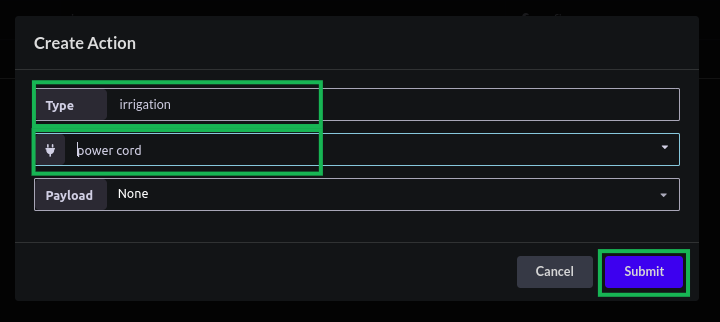
- Now you can find newly created actions on the action.

Triggering an Action
We need to follow these easy steps to trigger an action:
- Navigate to the Devices tab under Device Management
- Click on the checkboxes to select the list of devices you want to trigger the Action
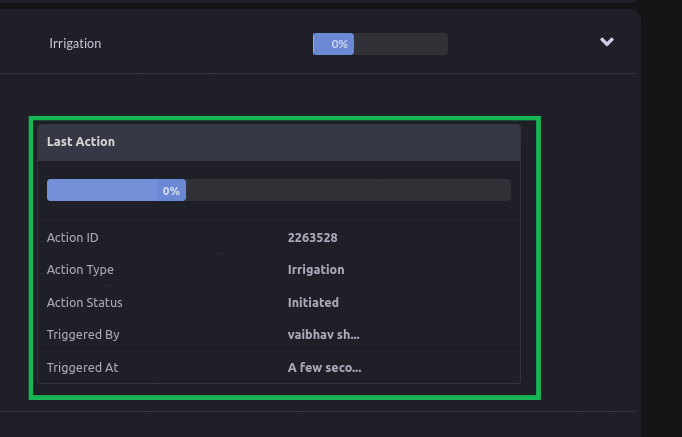
- Click on the Action button you want to trigger. In our case, we have selected a device with #id 1 and triggered 'irrigation' Action.
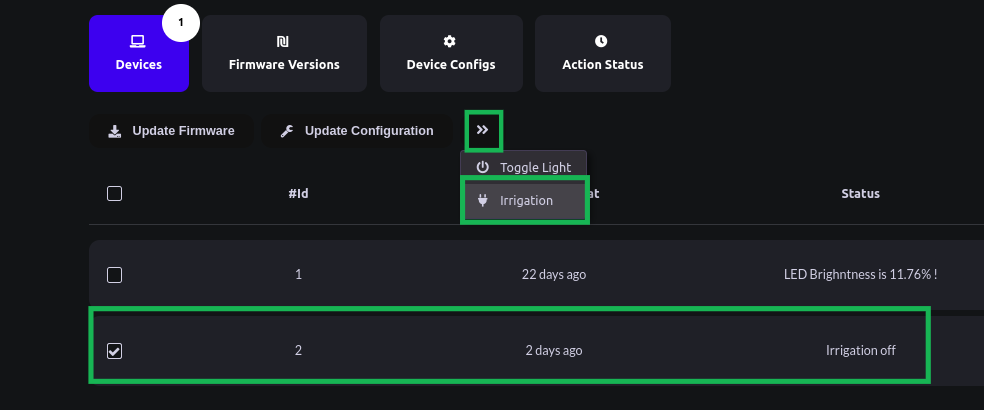
- In the Last Action column, you can see the Action status as Innitiated and you can monitor the progress of the action from the progress bar
Conclusion
To wrap up, In this guide we learn to create a straightforward yet highly effective solution for automating our irrigation system. We used ESP32 and Bytebeam Cloud to implement a drip irrigation system that ensures our plants receive the optimal amount of water, Even when we are away or on a vacation.
Explore other exciting features of the Bytebeam Arduino SDK! Check out our OTA guide for remote updates and the Handling Action Guide for remote operations.
I hope you gained valuable insights from this comparison summary. As we continue to come up with more interesting tutorials and maker content, we invite you to explore Bytebeam further and see how our platform can empower your projects.
Stay tuned!


.png)
