Getting Started with ESP32 Arduino and ByteBeam Part 5 - Update Configurations

Learn to update configuration on remote device using Bytebeam
In Earlier parts of this getting started guide, we understood some basic concepts of bytebeam cloud that can be very helpful for your IoT application.
- In Part 1 we set up the bytebeam cloud console and Arduino SDK.
- In Part 1 we also created a simple touch application and created a dashboard in the bytebeam cloud
- In Part 2 we created a bin for new firmware and performed over-the-air firmware updates on our ESP32 device.
- In Part 3 we created an action on Bytebeam cloud to toggle LED on ESP32
- In Part 4 we set up the Logs on ESP32 and created a dashboard to monitor Bytebeam Logs.
Within this article, we will be focusing on updating configurations using the Bytebeam cloud. We will create an application to control the brightness of ESP32 built-in LED using an update configuration feature.
Update configurations using Bytebeam
Bytebeam offers this cool feature to update the configurations of your IoT device. Next, we will guide you through the procedure to receive configurations from actions and to update device configurations using the bytebeam cloud using the following simple steps.
- Setup ESP32 hardware: We will set up ESP32 Built-In LED.
- Configuring update config action on ESP32: We will go through configuring the update configuration action handler in ESP32.
- Creating an action handler to receive configurations: We will create an action handler to receive configurations.
- Configuring Update Configuration JSON: We will create an update configuration JSON on Bytebeam cloud.
- Monitor Action progress on Bytebeam cloud: In the last section, we will trigger action and monitor its progress on Bytbeam cloud.
So let's get started.
Hardware Requirements
- ESP 32 dev module
Software and tools Specification
Setup ESP32 hardware
- Navigate to File->Examples->BytebeamArduino->UpdateConfig.
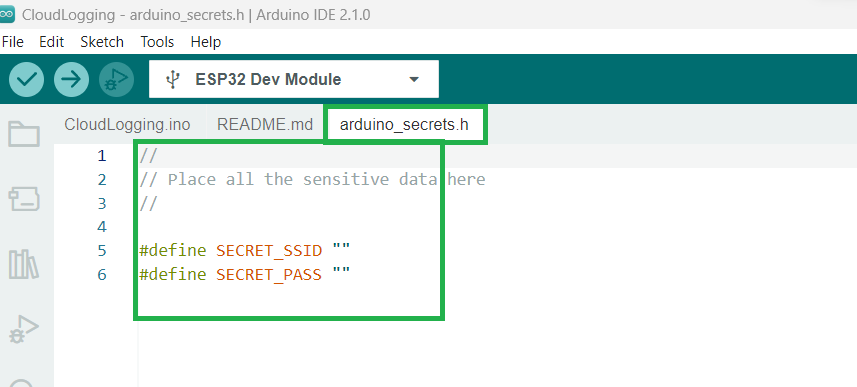
- First, to configure WiFi credentials navigate to arduino_secrets.h. and change your WiFi SSID and WIFi Password.
- Next include Bytebeam Arduino library
#include <BytebeamArduino.h>- ESP32 comes with a built-in led which is configured at GPIO 2. Define your led GPIO for this example
#define BOARD_LED 2- In setup(), call setupWiFi() function to connect to your provided WiFi credentials
- Next call syncTimeFromNtp() to sync time with NTP.
- call Bytebeam.begin() to begin Bytebeam client.
void setupWifi() {
  // set the wifi to station mode to connect to a access point
  WiFi.mode(WIFI_STA);
  WiFi.begin(WIFI_SSID , WIFI_PASSWORD);

  Serial.println();
  Serial.print("Connecting to " + String(WIFI_SSID));

  while (WiFi.status() != WL_CONNECTED) {
    Serial.print(".");
    delay(250);
  }

  Serial.print("Connected to " + String(WIFI_SSID) + ", Got IP address : ");
  Serial.println(WiFi.localIP());
}
void syncTimeFromNtp() {
// sync the time from ntp server
configTime(gmtOffset_sec, daylightOffset_sec, ntpServer);
struct tm timeinfo;
// get the current time
if(!getLocalTime(&timeinfo)) {
Serial.println("Failed to obtain time");
return;
}
// log the time info to serial :)
Serial.println(&timeinfo, "%A, %B %d %Y %H:%M:%S");
Serial.println();
}
- call Bytebeam.begin() to begin Bytebeam client.
// begin the bytebeam client
if(!Bytebeam.begin()) {
Serial.println("Bytebeam Client Initialization Failed.");
} else {
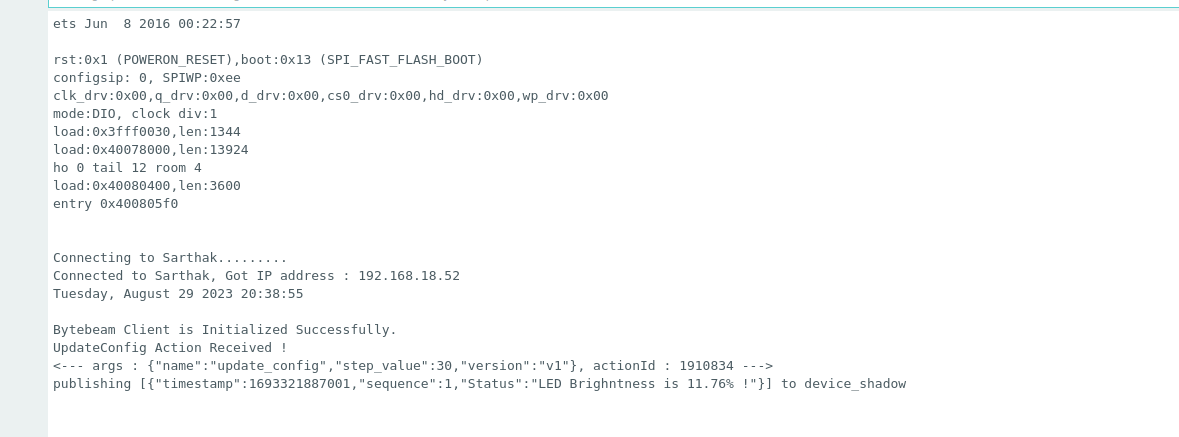
Serial.println("Bytebeam Client is Initialized Successfully.");
}
Configuring update config action on ESP32
In this section, we will start the bytebeam client, add the action handler and provide a name to our handler
- Add an action handler using the addActionHandler function. It contains the following arguments
- UpdateConfig_Hanlder: handler function to update configurations
- update_config: action name.
  // add the handler for update config action
  Bytebeam.addActionHandler(UpdateConfig_Hanlder, "update_config");
Creating an action handler to receive configurations
In this section, we will create an action handler to parse action arguments and control the LED duty cycle.
- In the last section, we added an UpdateConfig_Hanlder action handler function using addActionHandler
- UpdateConfig_Hanlder contains the following arguments
- args: configuration JSON received for bytebeam cloud.
- action_id: id of update_config action.
int UpdateConfig_Hanlder(char* args, char* actionId)- Inside the UpdateConfig_Hanlder function, first, parse the update config JSON.
StaticJsonDocument<1024> doc;
DeserializationError err = deserializeJson(doc, args);- In the received JSON we have the step_value object which contains the duty cycle information for led. parse step_value and set up the duty cycle of led accordingly.
ledDutyCycle = doc["step_value"];Configuring Update Configuration JSON
In this section, we will create update configuration JSON for the respective device id. Before going further create a new device in the bytebeam cloud.

- Provision your ESP32 device with device_config.json as we did in Part 1 of this series.
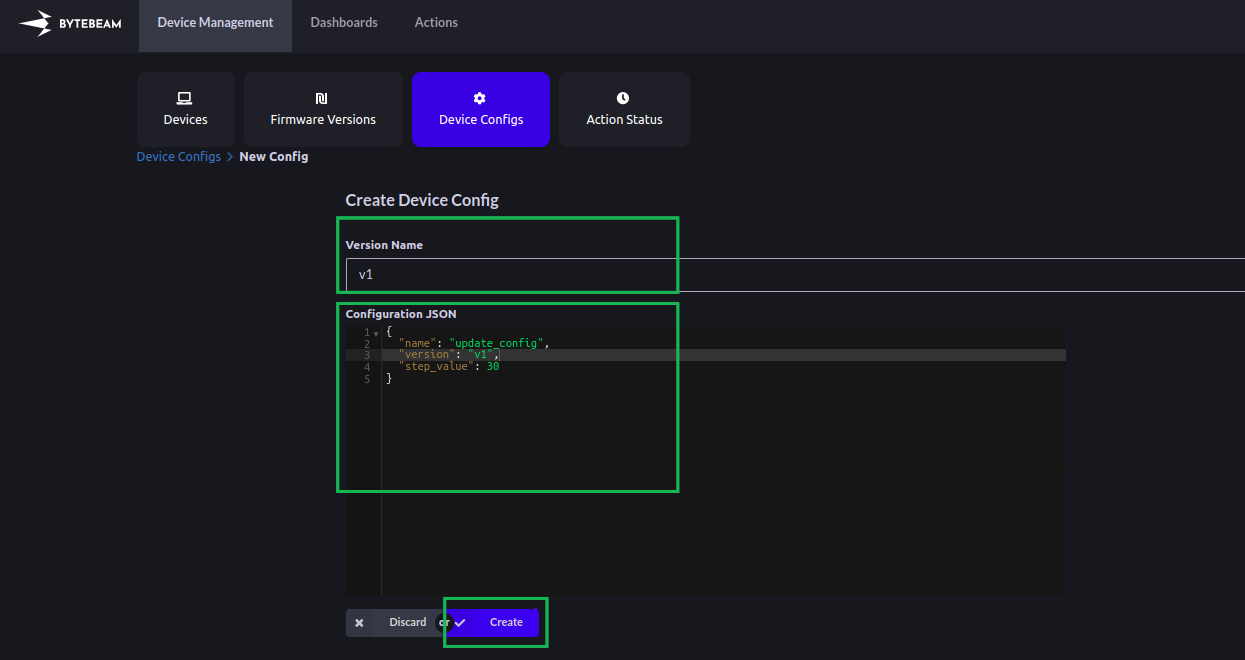
- Now navigate to the Device Configs panel and click on NewDevice Config.
- Here provide Version Name and Configuration JSON.

- Configuration JSON can be configured according to your use case. For this example, Configuration JSON contains the following objects
- name: name of your configuration
- version: version of your configuration
- step_value: step value can be any integer in the range of 0 to 255
{
  "name": "update_config",
  "version": "v1",
  "step_value": 30
}- Click on Create to create device configurations.
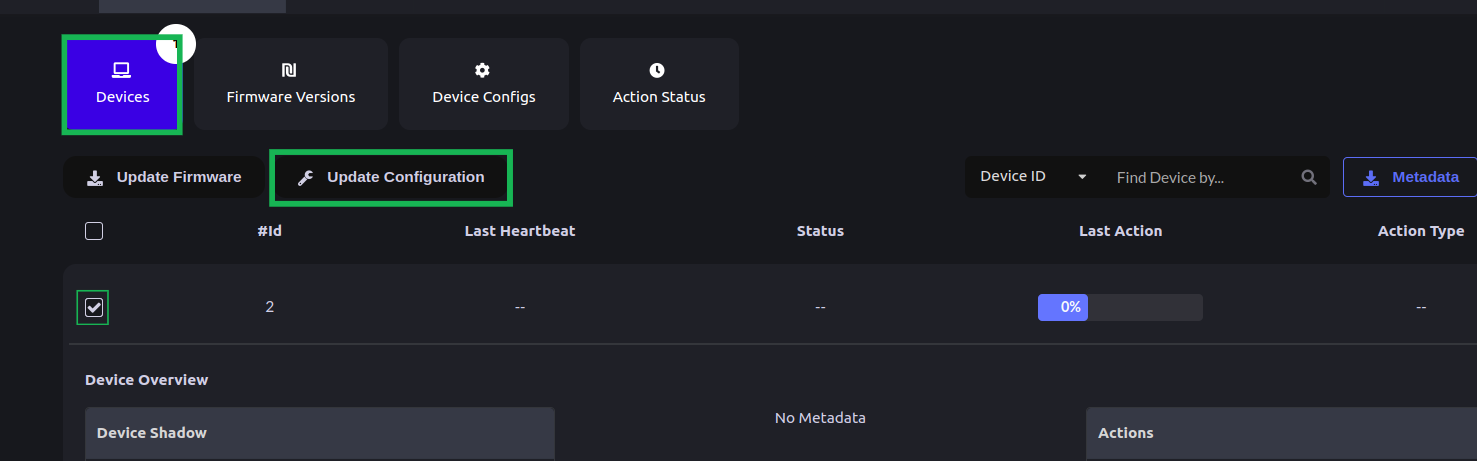
- Next, check the respective device and click on Update Configurations.
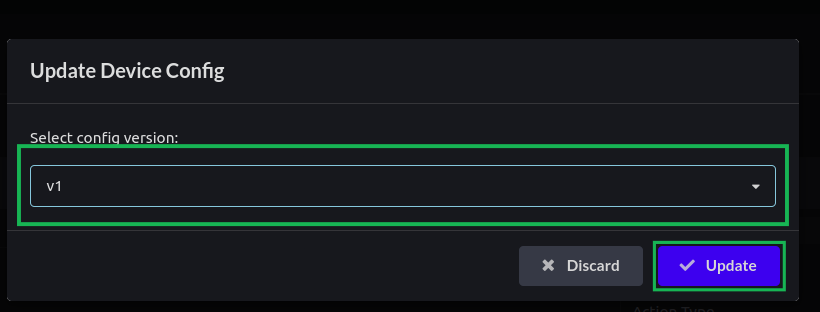
- Select your device configuration version and hit Update.
Monitor Action progress on Bytebeam cloud
- In the Last Action column, you can see the Action status as Queued and you can monitor the progress of the action from the progress bar. Next when the device receives the action the status will change to initiated.
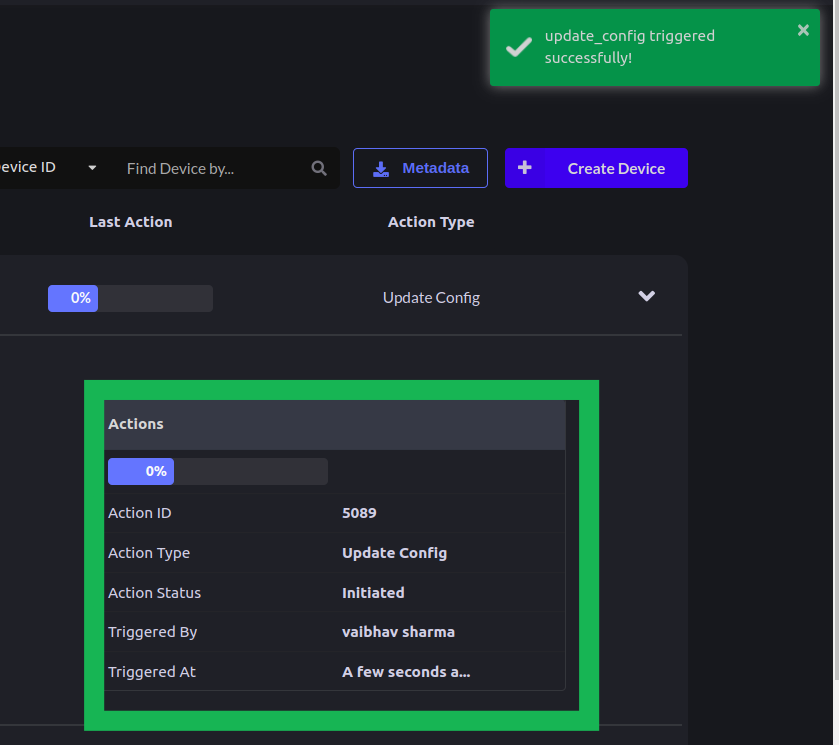
- After successful execution of the action, the Action status will be charged to Completed.

Conclusion
Using update configuration feature of bytebeam you can serve many use cases in run time. Check out our other guides on Data visualization, OTA, Handling actions and Remote Debugging as well. I hope you find this guide useful. We will come up with more interesting tutorials and maker content. Stay tuned.
.png)


