Indoor Air Quality analysis using a CO2 monitoring system based on Bytebeam ESP-IDF SDK and Bytebeam cloud
people typically spend more than 90% of their time in indoor environments. Monitoring of indoor air quality parameters like CO2 plays an important role in a healthy lifestyle.
Indoor air quality monitoring is a very often talked about topic nowadays as it critically affects a person's health, comfort, and safety.
People who might be at their homes, workplace offices, etc. typically spend more than 90% of their time in indoor environments. So, It is not only directly related to occupational health but also has a significant impact on the quality of life of people.
One of the key indicators of indoor air quality is Carbon dioxide (CO2) and it has a substantial influence on public health. Thus, regular monitoring and Analysis of indoor air quality parameters like CO2 becomes essentially important to regulate occupational health and ensure better working environments
Some of the Factors affecting indoor CO2 levels include:
- Number of people in a room
- A person’s metabolic rate
- Amount of time a person spent in the room
- Ventilation rate (exchanges per hour with fresh outside air)
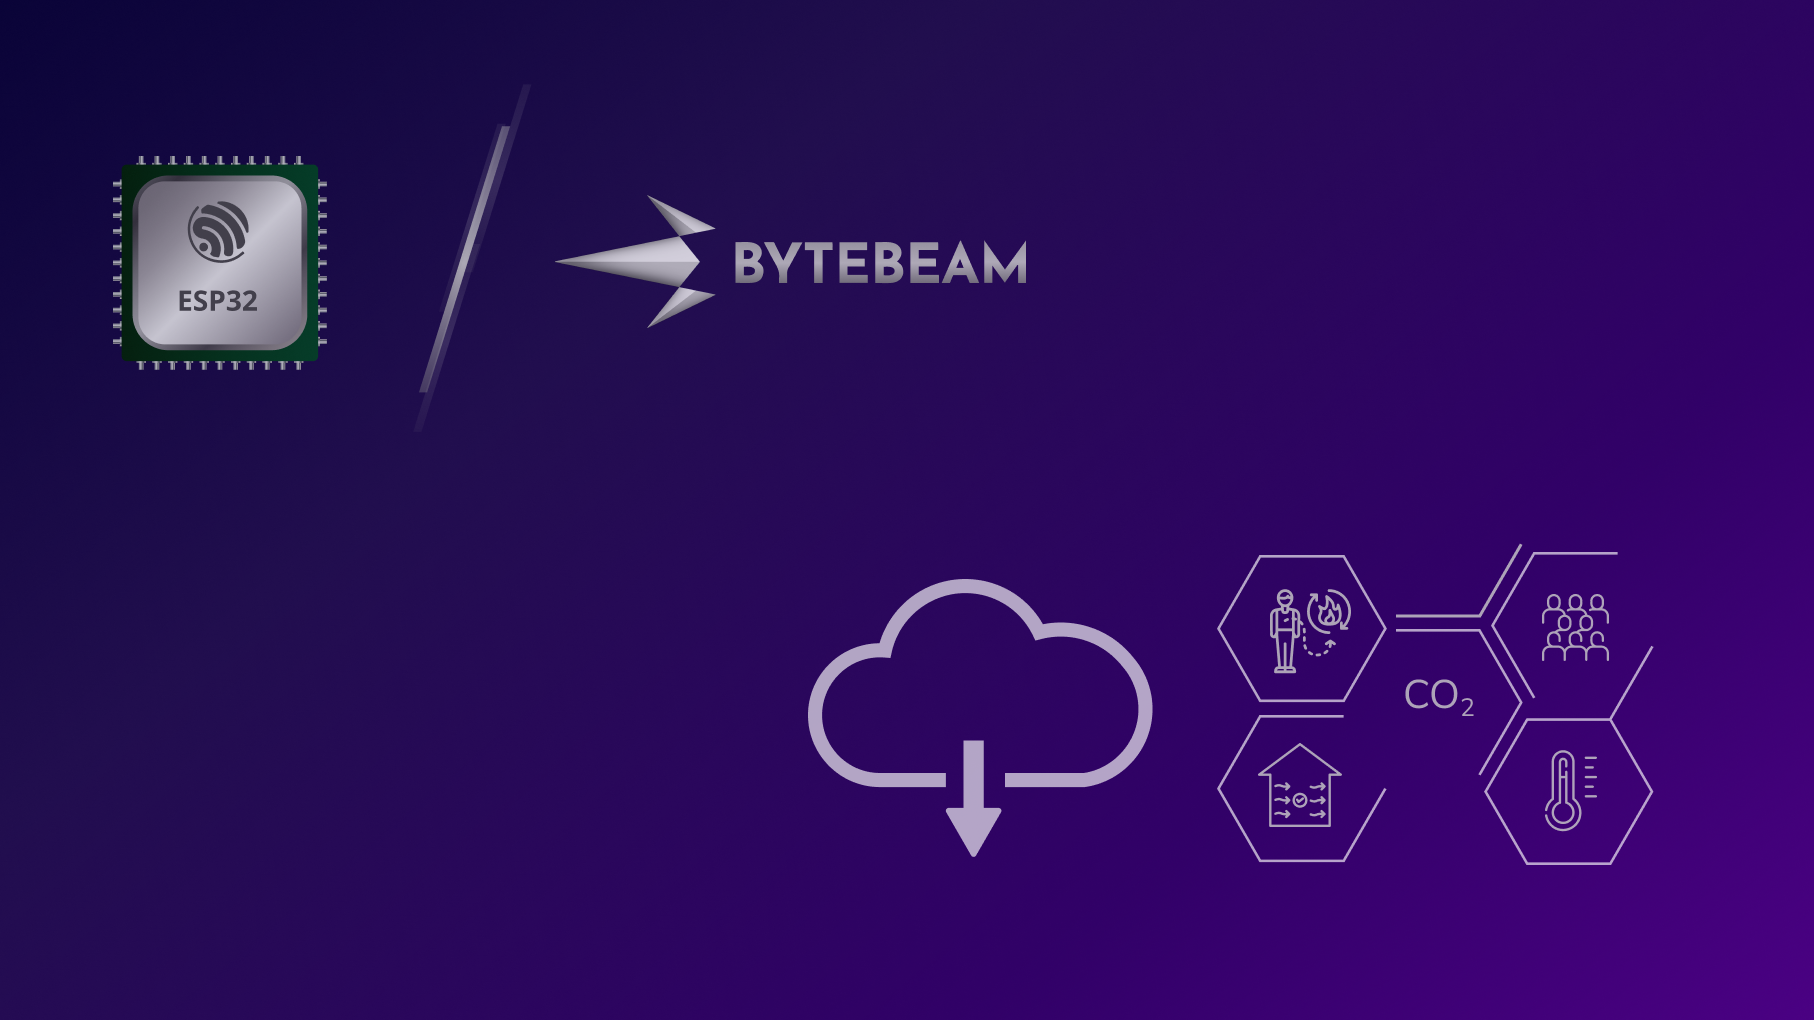
Keeping in mind all the factors affecting indoor CO2 levels we will be going through a step-by-step guide to creating an IoT indoor air quality monitoring system. In this solution, we will be monitoring CO2, temperature, and Humidity using ESP32 and Bytebeam Cloud. In this blog, we will be demonstrating the following:
- Setting up ESP32
- Interfacing CO2 sensor and Temperature and Humidity Sensor with ESP32
- Interfacing relay with ESP32 to control window blinds to regulate ventilation.
- Setting Up Bytebeam ESP-IDF SDK.
- Integrating ESP32 with Bytebeam Cloud
- Visualizing CO2 sensor data on Bytebeam Cloud Dashboard.
So Let's get started.
Hardware and Software Specifications
Hardware Specification
Software Specification
- Bytebeam cloud platform account
- ESP-IoT Development Framework
- Bytebeam ESP-IDF SDK
- SHT31 ESP-IDF Library
- CCS811 ESP-IDF Library
- Indoor Air Quality ESP-IDF application
Setting Up Bytebeam Cloud
Bytebeam is a fully managed cloud platform. Which serves all cloud needs from device management to dashboard, Handling actions, and notification to OTA updates. It provides the following features
- Device Registry
- Over The Air Updates
- Configuration Management
- Device to mobile communication
- Web Dashboard
- Role-based Access controls
If you are new to the Bytebeam IoT cloud platform. Go through the getting started with bytebeam tutorial to dive deep into the concepts of Bytebeam.
I hope you found the getting started guide useful and are aware of the concepts of Bytebeam Cloud.
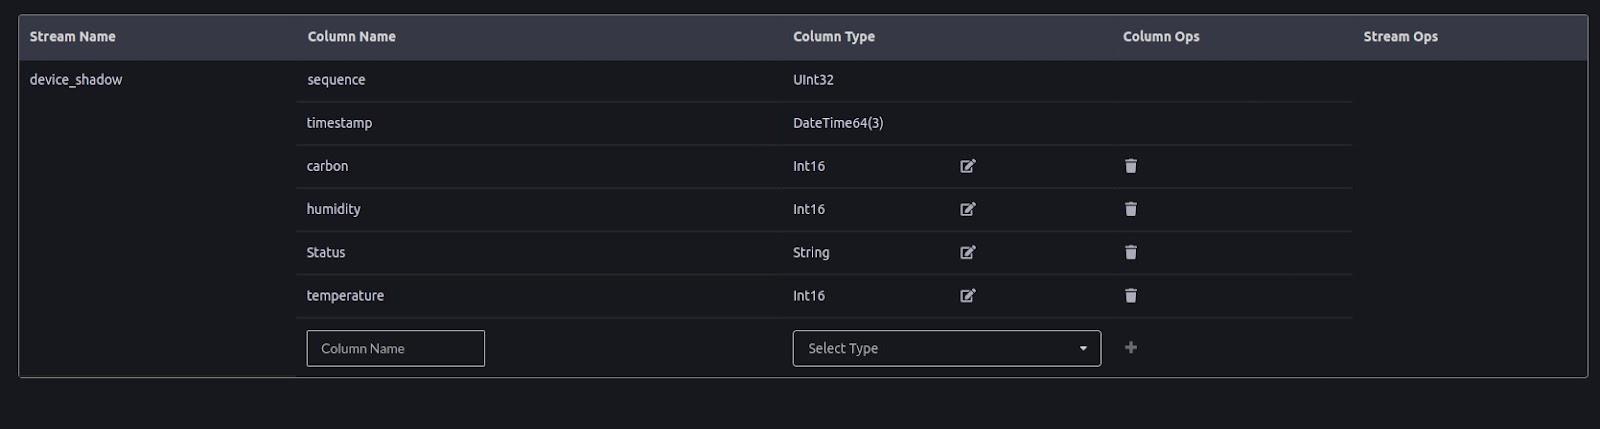
- Next, we are using temperature, humidity, and CO2 parameters. We need to configure the stream according to our project in the Bytebeam cloud console. For that go to Admin -> Streams and add temperature, humidity, and carbon in the column name with their respective data type.
- Now we need to download a device provisioning file from the console. We will need this file later for device provisioning. For that go to Device Management and click on Download config.
- Rename this file as device_config.json
Setting Up ESP32
Hardware connection
ESP32 uses GPIO 21 and GPIO 22 pins for I2C. SDA pin is connected to GPIO 21 and SCL pin is connected to GPIO 22.
- CCS811 CO2 sensor comes with an I2C connection. Connect the SDA Pin of CCS811 with GPIO21 of ESP32 and the SCL Pin with GPIO 22 of ESP32.
- SHT31 Temperature and Humidity Sensor come with an I2C connection. Connect the SDA Pin of ESP32 with GPIO21 of ESP32 and the SCL Pin with GPIO 22 of ESP32.
- Connect 5V SSD Relay with GPIO 4
Project Setup
- Clone bytebeam-esp-idf-sdk using the git clone command.
git clone https://github.com/bytebeamio/bytebeam-esp-idf-sdk- The Repository contains the following directories
- components: This directory contains bytebeam_esp_sdk as a component that you can add to your ESP application
- Provisioning: This directory contains SPIFFS and FATFS provisioning examples to push device JSON got from bytebeam cloud to SPIFFS or FATFS
- examples: examples directory contains a list of examples, some of the important ones are
- Now clone the indoorAirQuality example.
git clone https://github.com/vbshightime/indoorAirQuality- Paste it inside bytebeam-esp-idf-sdk.
Provision ESP32 with device config data
Earlier in this guide, we had provisioned a new device in the bytebeam cloud console and downloaded a JSON file. We need to flash this file to SPIFFS to connect our device to the cloud.
- Now navigate to the provisioning directory and then to spiffs_provisioning. Here you will find a folder config_data inside it.
- Replace the contents of the device_config.json inside config_data with the device_config.json you downloaded from the cloud.
- Now open the ESP-IDF terminal and navigate to the provisioning/spiffs_provisioning project.
- Clear entire flash
idf.py erase-flash- Once the flash is erased, upload the spiffs_provisioning example. This will flash the device_config.json file to the device
idf.py -p PORT flash monitorGetting CO2 Sensor and temperature and humidity sensor values
- Navigate to indoorAirQuality-> main -> app_main.c.
- include ccs811 driver and sht31 driver
#include "ccs811/ccs811.h"
#include "sht31.h"- inside app_main initialise the ccs811 CO2 sensor
if (init_ccs811()){
        printf("\nInitialized!!!\n");
    }
    else{
        printf("\nNO Initialized\n");
}- Now initialise SHT31 sensor
  if (sht31_init()) {
        printf("Initialised SHT31");
    } else {
        printf("Could not initialize SHT3x sensor\n");
}- We will get the Co2 values using get_ccs811() function
- We will get temperature and humidity values using getSHTValues()
getSHTValues()- Now add Co2, temperature and humid values to the payload
carbon_json = cJSON_CreateNumber(get_ccs811(0));
cJSON_AddItemToObject(device_shadow_json, "carbon", carbon_json);
humid_json = cJSON_CreateNumber(humidity);
cJSON_AddItemToObject(device_shadow_json, "humidity", humid_json);
temperature_json = cJSON_CreateNumber(temperature);
cJSON_AddItemToObject(device_shadow_json, "temperature", temperature_json);Creating an action handler to control blinds
Increasing levels of CO2 in the workspace can cause laziness and sleepiness. So to regulate the flow of fresh air. We are using a relay to open and close window blinds to improve airflow.
We will trigger this action whenever the CO2 levels cross a particular threshold(1000PPM)
We can create an action handler using these simple steps.
- We have connected the 5V SSD relay to GPIO 4
#define BLINK_GPIO 4- In configure_blinds function, we will configure the GPIO mode as GPIO_MODE_OUTPUT
static void configure_blinds(void)
{
   gpio_reset_pin(BLINK_GPIO);
   gpio_set_direction(BLINK_GPIO, GPIO_MODE_OUTPUT);
}- Add an action handler using the bytebeam_add_action_handler function. It contains the following arguments
- bytebeam_client: structure containing host, port, certificates and device id information
- toggle_blinds: handler function to toggle relay
- toggle_blind: action name
bytebeam_add_action_handler(&bytebeam_client, toggle_blinds, "toggle_blind");Flash and Upload
- Now flash and upload the example
Idf.py -p PORT flash monitorIn the next section, we will add "toggle_blind" action on the bytebeam cloud.
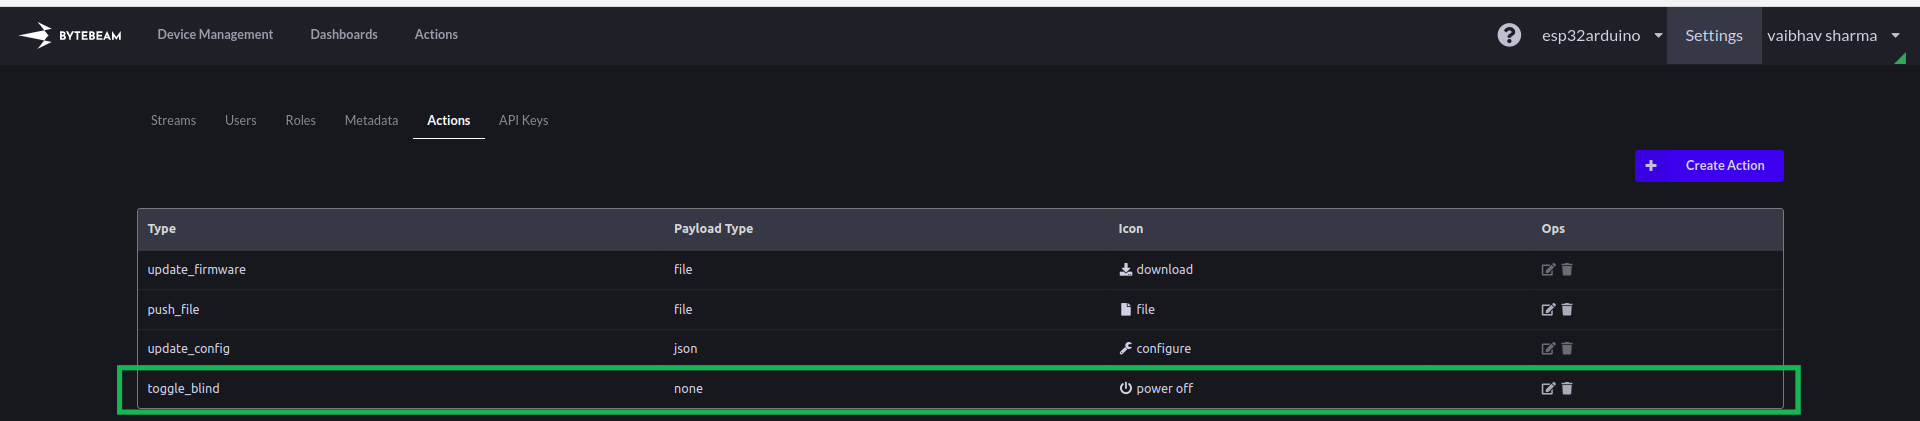
Adding action on Bytebeam cloud
- Login to your bytebeam cloud account and go to the Device Management tab
- Here you can see preconfigured actions like Update Firmware, Update Configuration, and Push File.
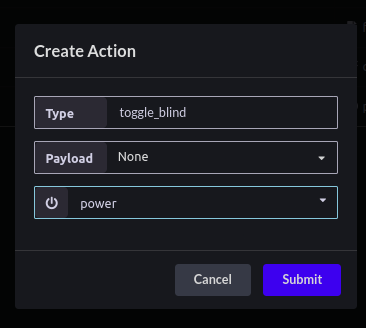
- To create a new action Click on the Settings tab and then navigate to Actions. Then click on Create Action to configure a new action.

- On the next screen, you can see a Type edit text and a drop-down to select Icon.
- In Type edit text we need to write down the action name i.e. toggle_board_led in our case. Earlier in Configuring actions in the ESP32 section, we created an action handler with toggle_blind as the action name.
- Then select an icon from the drop-down. We have selected the power off icon for this example. You can choose any from the list. Then hit submit
- Now you can find newly created actions on the action list
Triggering an Action
We need to follow these easy steps to trigger an action:
- Navigate to the Devices tab under Device Management
- Click on the checkboxes to select the list of devices you want to trigger the Action
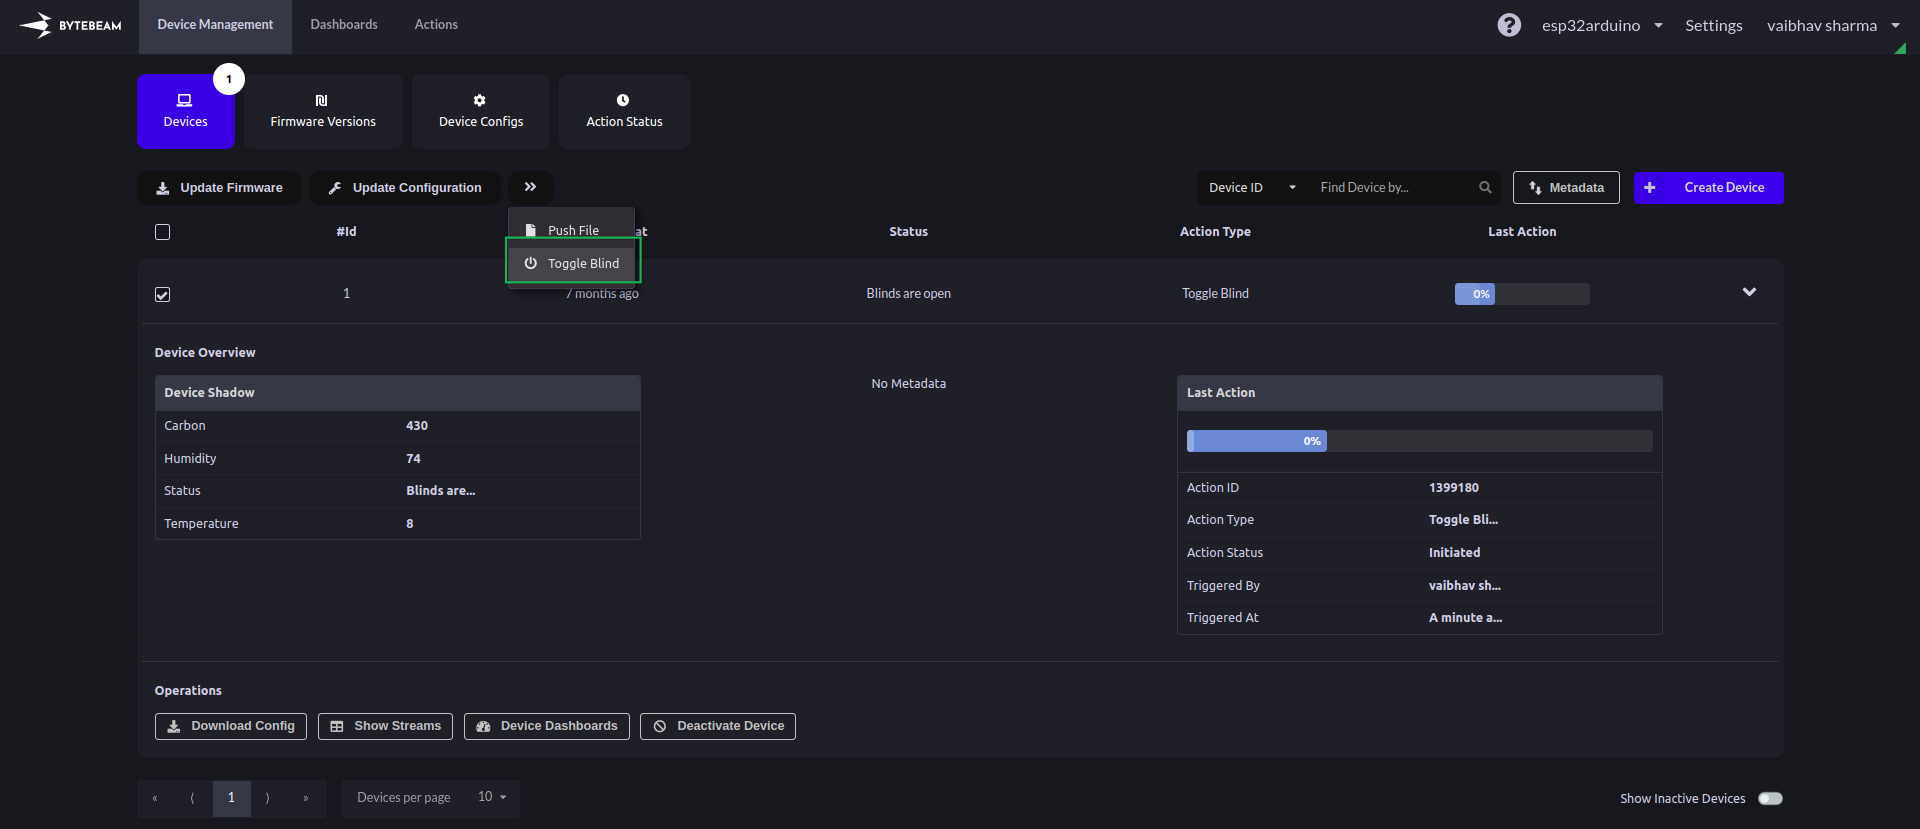
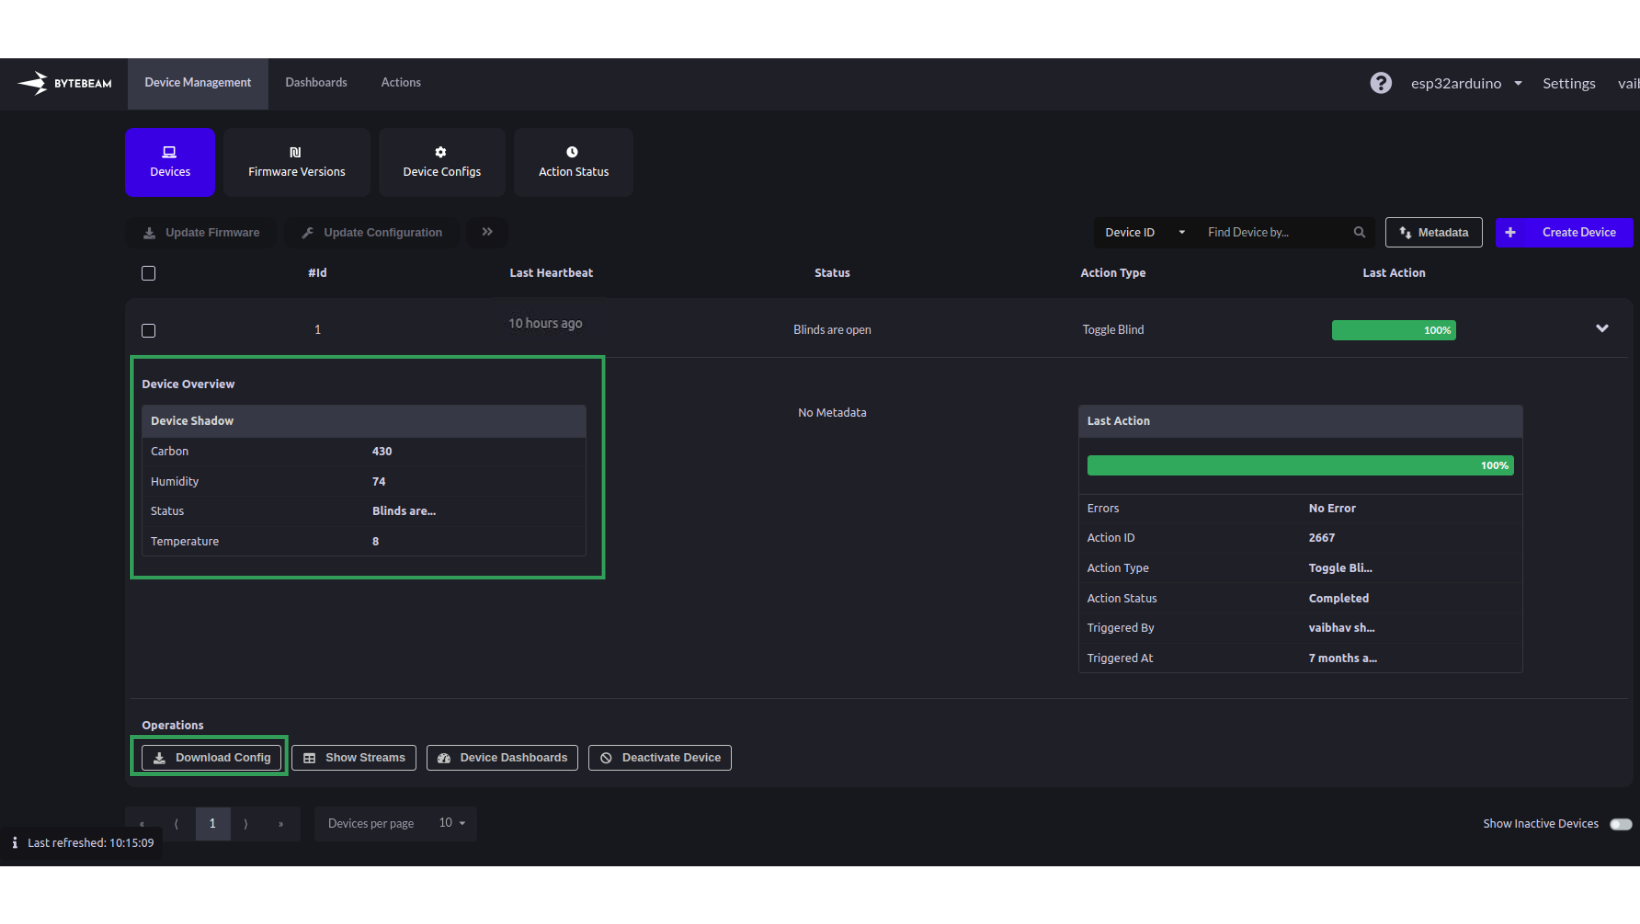
- Click on the Action button you want to trigger. In our case, we have selected a device with #id 1 and triggered 'Toggle Blind' Action.
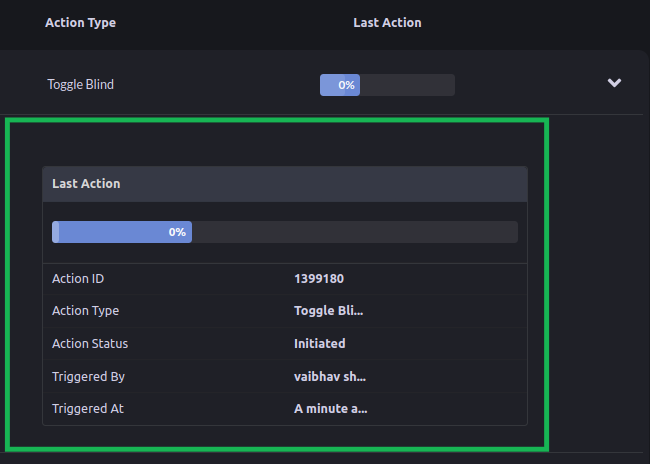
- In the Last Action column, you can see the Action status as Initiated and you can monitor the progress of the action from the progress bar
- The Action will be sent to the selected Devices now. If the device is offline when the Action is triggered, the system will retry sending Actions to the device every 5s.
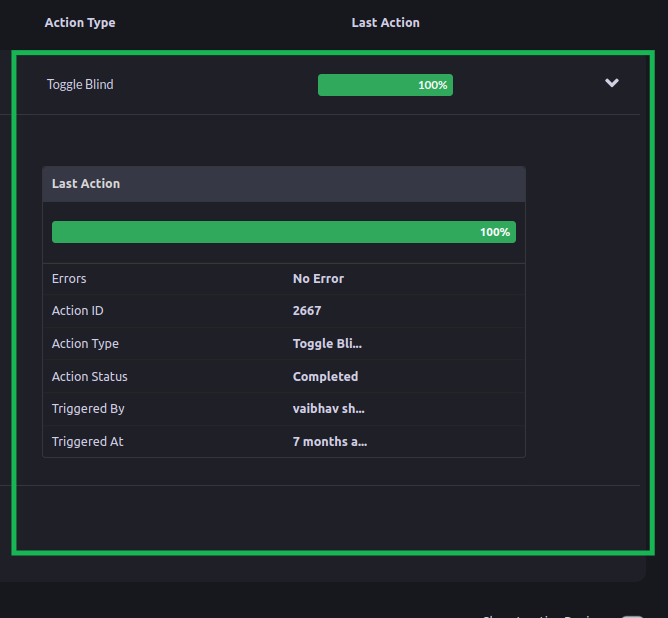
- After successful execution of the action, the Action status will be charged to Completed.
- Here action we need to perform is to automate our windows blinds when the CO2 level crosses a threshold.
- Earlier before triggering the action. The status was “Blinds are closed”.
- After triggering the Toggle Blind action. The status changed to Blinds are open. And action status changed to Completed.
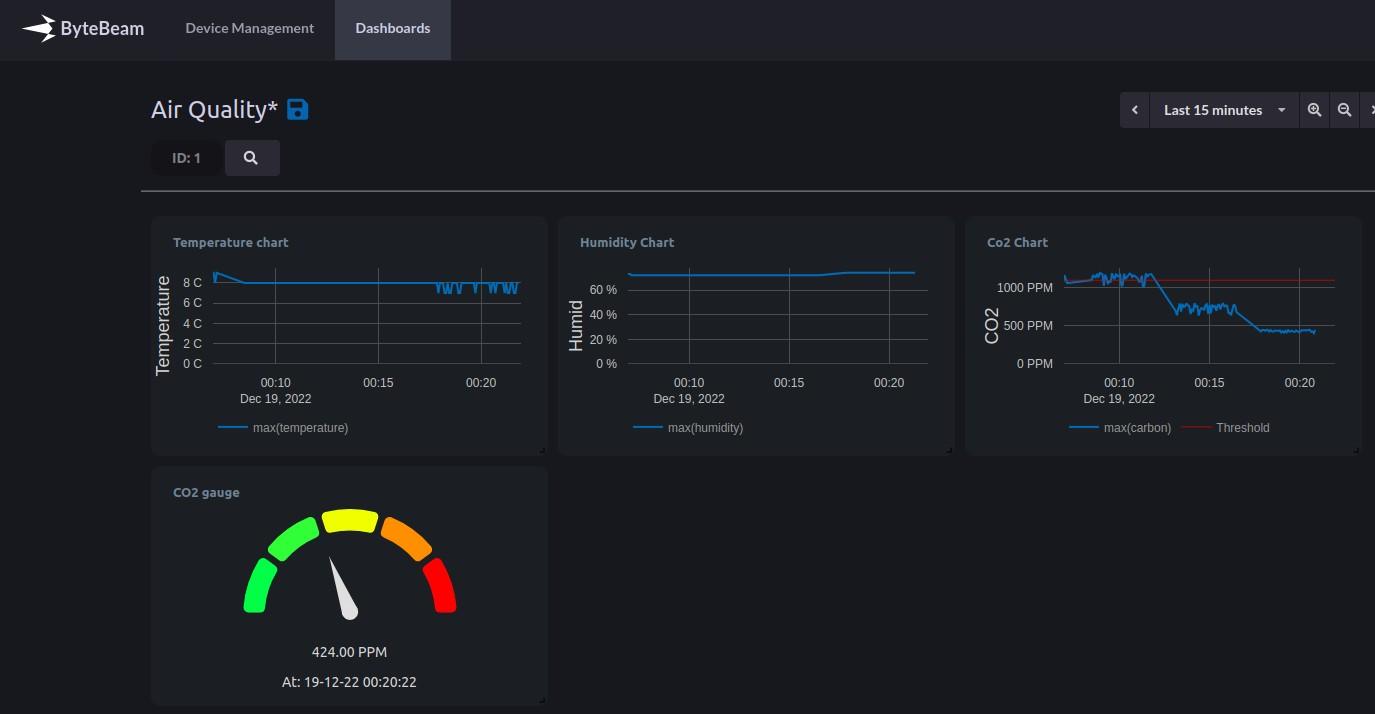
Data Visualization in Bytebeam Cloud
- After a successful connection of ESP32 with Bytebeam Cloud. We can see the recent device shadow and heartbeat on the cloud console.
- Next, create a Dashboard of your choice We have made use of line charts and gauges to create our dashboard. You can use it as per your choice.
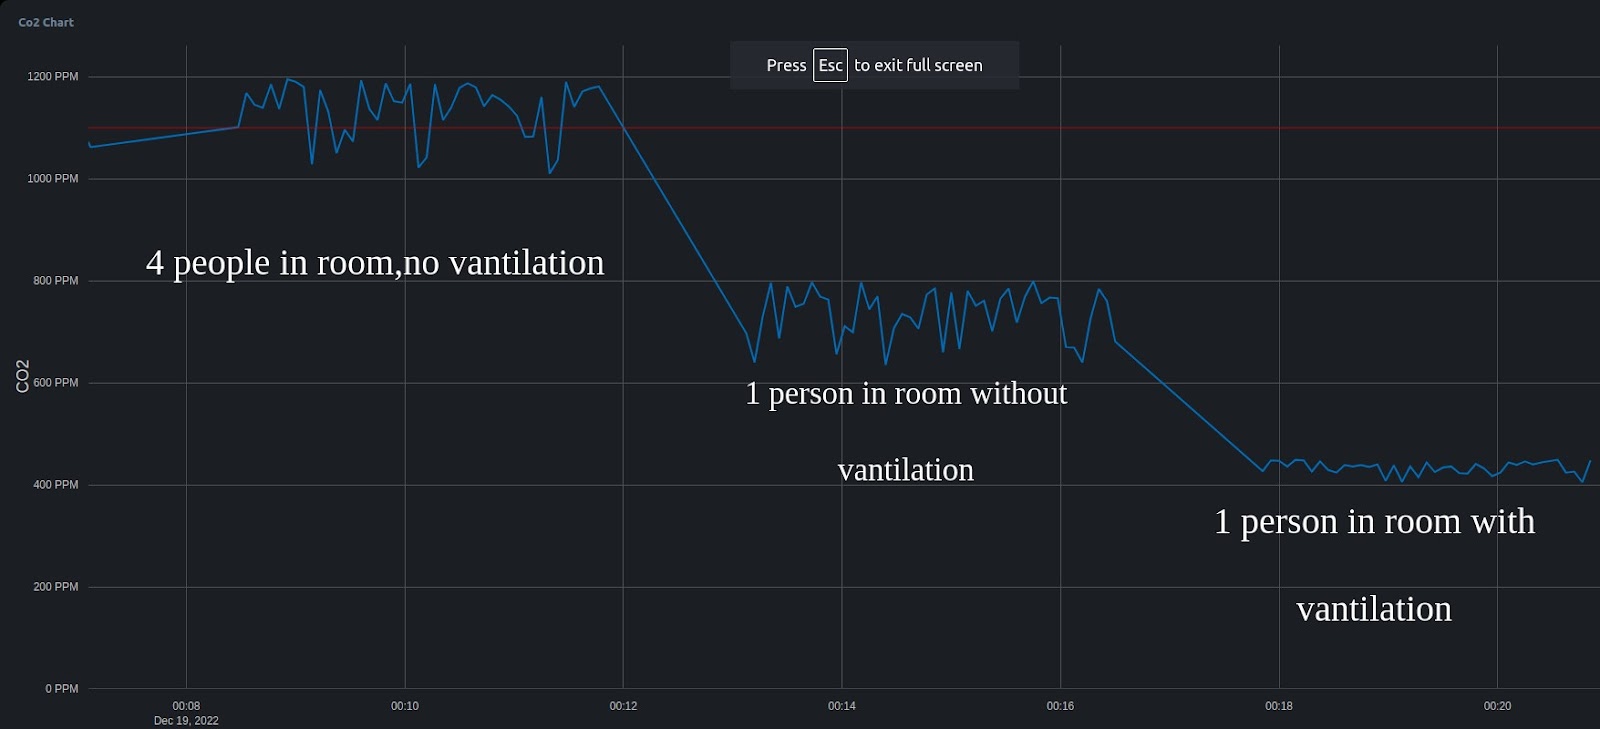
Guidelines to Check CO2 Levels in a Workplace
Escalation of CO2 levels in a workplace can affect your health in different ways. The CO2 levels can differ based on occupancy, ventilation, and respiration rate. The increasing level can also cause laziness, sleepiness, dizziness etc.
| Carbon Dioxide concentration | Description of indoor quality |
|---|---|
| 350-400 PPM | Fresh Air |
| less than 600 PPM | Acceptable conditions of indoor air quality in rooms |
| 1000 PPM | The Upper limit of fresh air. But need to open windows can cause laziness |
| 1500 PPM | Not fresh Air |
| 2000 PPM | Can cause respiratory illness and dizziness |
| >1000 PPM | Bad air quality and problems in breathing |
As we can see in the graph variation in CO2 level as the occupancy and ventilation in the room changes
Conclusion
In this way, you can build an indoor air quality analyser using ESP32 & Bytebeam Cloud to monitor the sensor data regularly on Cloud. I hope you find this guide useful.
Explore other exciting features of the Bytebeam ESP-IDF SDK! Check out our data Visualization guide for creating interactive dashboards, OTA guide for remote updates and the Handling Action Guide for remote operations.
We will come up with more interesting tutorials and maker content. Stay tuned.


.png)
