Getting Started with Bytebeam Arduino SDK for GSM: A Step-by-Step Guide

Learn about device management and data visualization using Bytebeam Arduino SDK for GSM
GSM (Global System for Mobile Communications) is an essential technology in the Internet of Things (IoT) landscape, offering a wide range of features that have made it indispensable in IoT applications. Its importance and impact in the IoT space cannot be overstated. According to recent statistics, GSM technology is projected to reach 25 billion connections by 2025, demonstrating its widespread adoption and significance in the IoT ecosystem.
In addition to the traditional features of GSM, the introduction of new terminologies like NB-IoT (Narrowband IoT) and 5G has further enhanced the capabilities of GSM in IoT. This advancement has positively impacted the IoT industry by allowing for the deployment of low-cost, low-power devices in applications that require extended battery life and comprehensive coverage.
Now, with the introduction of a new feature in the Bytebeam Arduino SDK, integrating GSM protocols into your IoT projects has become even more accessible. This blog serves as a comprehensive step-by-step guide, explaining how to integrate GSM into your IoT endeavors and leverage the powerful visualization capabilities of the Bytebeam cloud.
We have created a series of getting started guides with Bytebeam. Before going further, go through our data visualization guide to set up the Bytebeam cloud console, Bytebeam Arduino SDK, and provision ESP32.
So Let's get started.
Hardware Specification
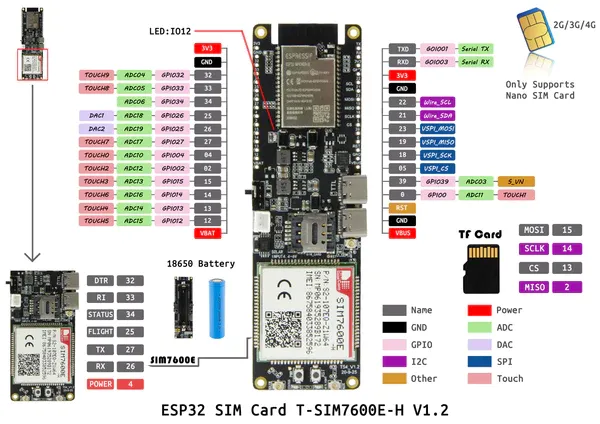
For this guide, we are using TTGO T-SIM7600E. T SIM7600E is an ESP32 development board with SIM7600E GSM.
Software Specification
We recommend installing the latest version of all the tools and IDE.
Setting Up GSM connectivity
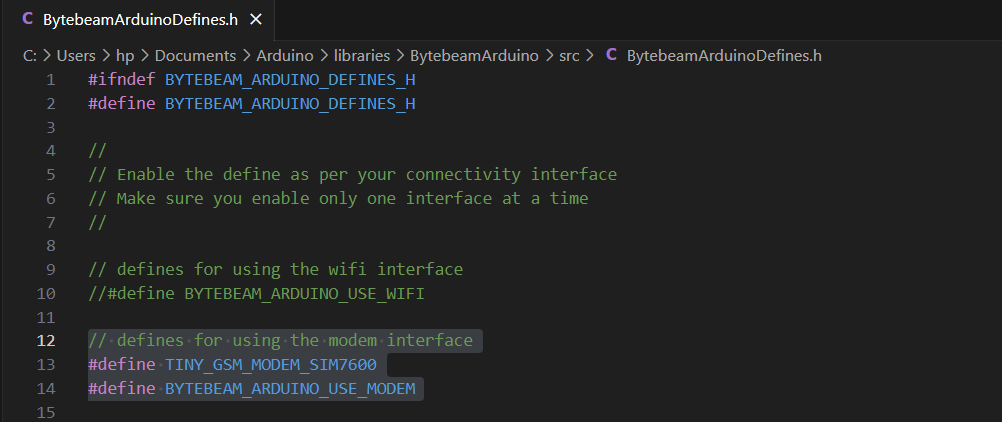
This guide assumes that you have gone through device visualization guide and have set up ESP32 with bytebeam cloud. In this guide, We will do the necessary steps to set up GSM connectivity and we will monitor device data on Bytebeam cloud. Firstly to enable GSM capability in SDK, Navigate to the location of Arduino's libraries folder on your PC. Find BytebeamArduino here. Inside it, Go to src -> BytebeamArduinoDefines.h. Here, comment out WiFi defines and uncomment modem defines.
BytebeamArduinoDefines.h
// defines for using the wifi interface
//#define BYTEBEAM_ARDUINO_USE_WIFI

// defines for using the modem interface
#define TINY_GSM_MODEM_SIM7600
#define BYTEBEAM_ARDUINO_USE_MODEM
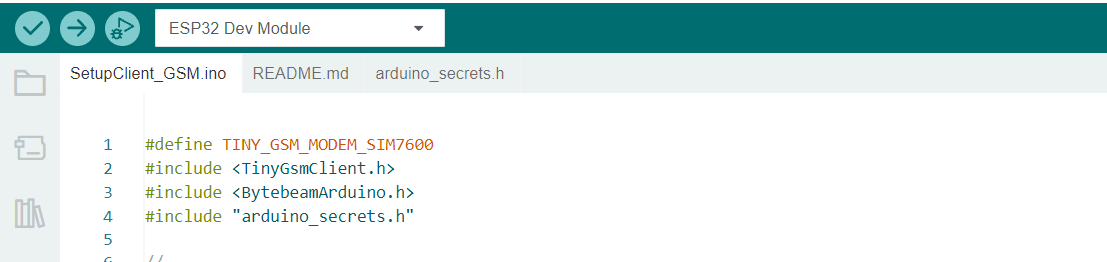
- Navigate to File->Examples->BytebeamArduino->ESP32->SetupClient_GSM.
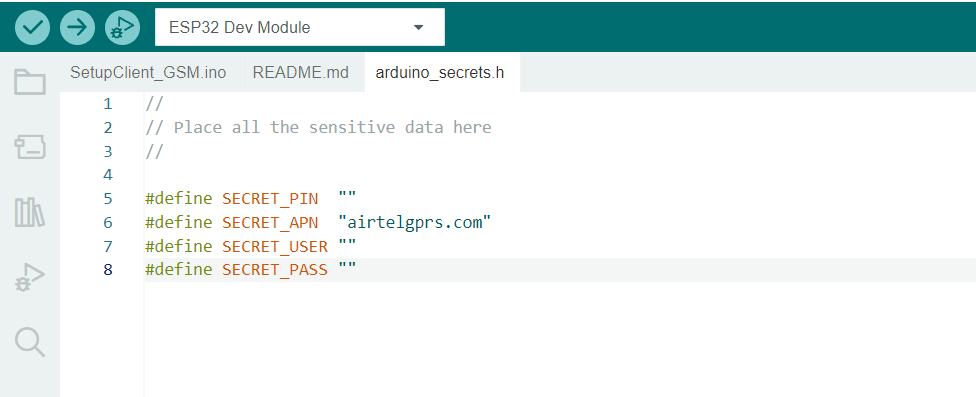
- To set up your APN, PIN, USER, and PASSKEY, navigate to arduino_secrets.h and modify SECRET_PIN, SECRET_APN, SECRET_USER, and SECRET_PASS. In case your data sim operator does not provide your username, pass, and pin then leave these blank
- Next, navigate back to Setup_Client_GSM.ino. Here you can find the following headers
- TinyGsmClient: This is the component of the TinyGSM Arduino library for GSM
- BytebeamArduino: Bytebeam Arduino SDK. By including this header you get access to the global object named Bytebeam
- Define the Hardware Serial of your ESP32. We will define Serial1 for serial communication with the modem and Serial for debugging.

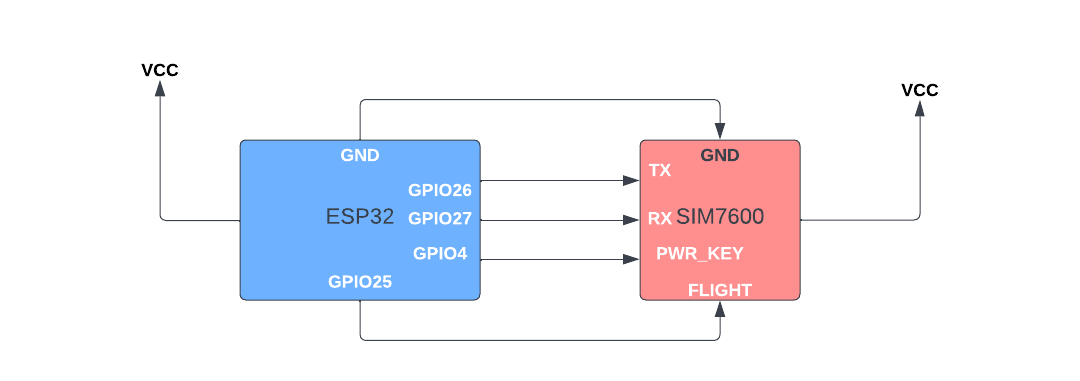
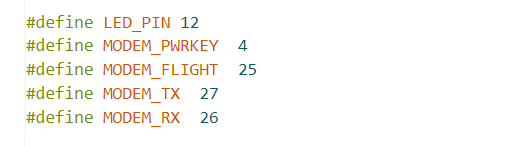
- Define ESP32 GPIO. In TTGO T-SIM7600E SIM 7600 modem is serially connected to ESP32. If you are using the ESP32 module and SIM7600 modem separately then you can define your GPIO connections accordingly
- Initialize TinyGSM object it takes ESP32 hardware Serial as argument.
TinyGsm modem(SerialAT);- Next in setupModem() function, Configure Reset, status and enable pins as output

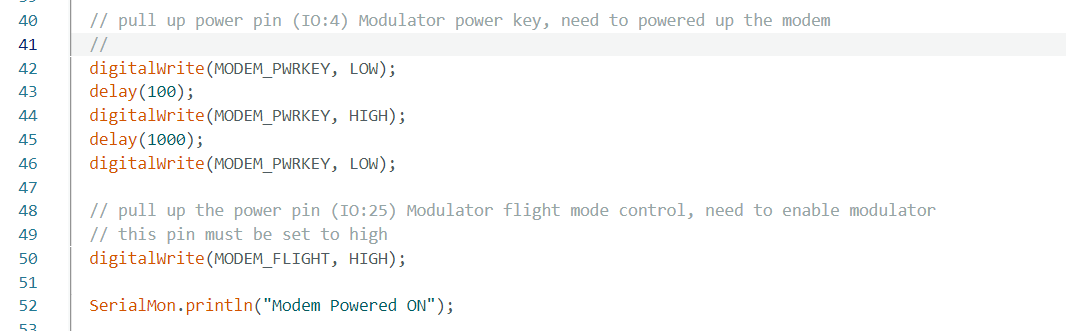
- In order to power up the modem MODEM_PWRKEY must be held high for 1 second. Then to enable the modem MODEM_FLIGHT pin should be held high.
- call SerialAT.begin begin serial communication between ESP32 and modem
SerialAT.begin(115200, SERIAL_8N1, MODEM_RX, MODEM_TX);- Then restart the modem and choose Network mode. 2 means automatic selection.
modem.restart();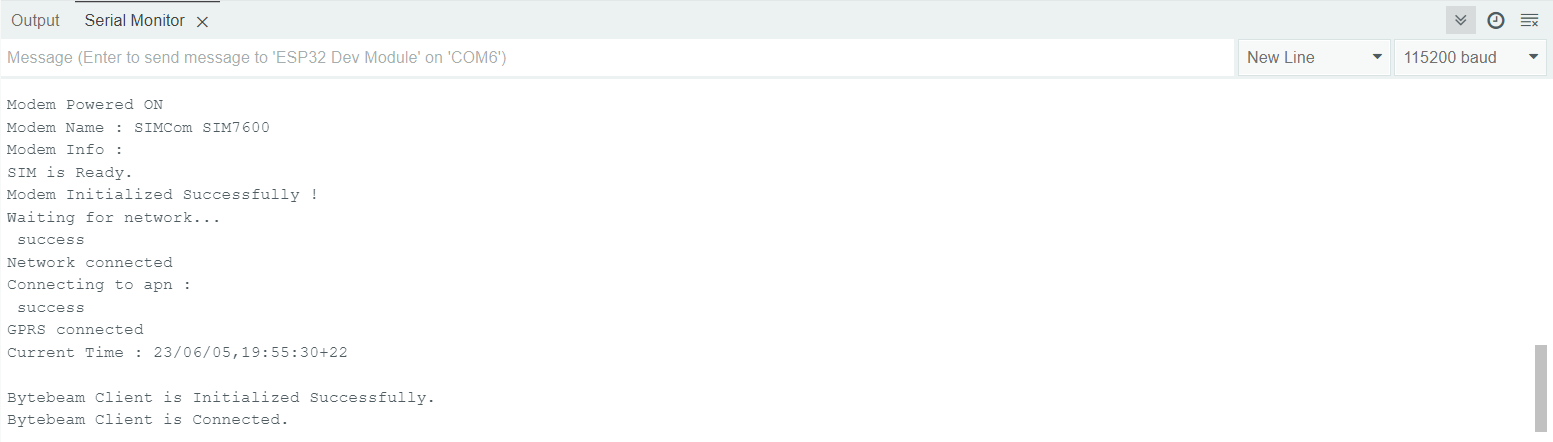
modem.setNetworkMode();- Wait for the network until it gets connected. On the development board, you will see a continuous blinking LED.
 SerialMon.println("Waiting for network...");
  if(!modem.waitForNetwork()) {
    SerialMon.println(" fail");
    delay(10000);
    return;
}- After a successful connection with the network, make a GPRS connection.
if(modem.isNetworkConnected()) {
    SerialMon.println("Network connected");
  }

  // GPRS connection parameters are usually set after network registration
  SerialMon.print("Connecting to apn : ");
  SerialMon.println(apn);

  if (!modem.gprsConnect(apn)) {
    SerialMon.println(" fail");
    delay(10000);
    return;
  }
  SerialMon.println(" success");

  if(modem.isGprsConnected()) {
    SerialMon.println("GPRS connected");
}- In setup(), call Bytebeam.begin() and provide a reference of the TinyGSM object to begin the Bytebeam client.
if(!Bytebeam.begin(&modem)) {
    Serial.println("Bytebeam Client Initialization Failed.");
  } else {
    Serial.println("Bytebeam Client is Initialized Successfully.");
  }
- In loop(), call Bytebeam.loop() to maintain a connection with the MQTT broker.
- Now Upload your example by clicking on the Upload icon.
Monitoring Device Status
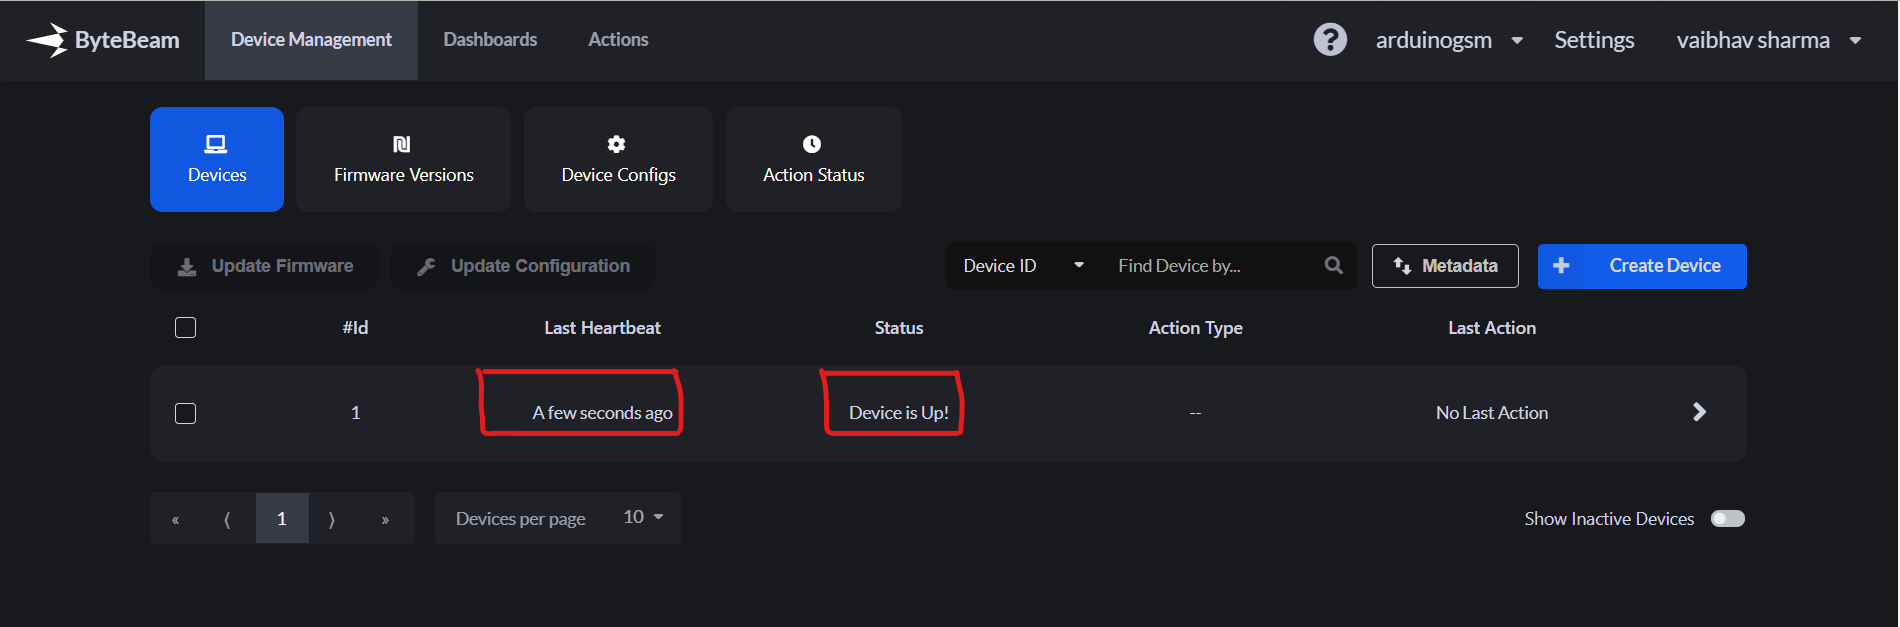
- Login to your bytebeam cloud account and go to the Device Management tab
- Here you can see the device Id, the device's last heartbeat, and its status.
Conclusion
In conclusion, integrating GSM with IoT projects using the Bytebeam Arduino SDK is a powerful way to unlock its full potential. With seamless connectivity, wide coverage, and reliable communication, GSM enables IoT applications to thrive across various industries.
Explore other exciting features of the Bytebeam Arduino SDK! Check out our OTA guide for remote updates and the Handling Action Guide for remote operations.
I hope you gained valuable insights from this comparison summary. As we continue to come up with more interesting tutorials and maker content, we invite you to explore Bytebeam further and see how our platform can empower your projects.
Stay tuned!


