Step-by-Step guide: Setting up Raspbian OS and configuring SSH on raspberry pi
Raspberry Pi, a revolutionary single-board computer, has taken the tech world by storm since its introduction in 2012. Created by the Raspberry Pi Foundation this mini-computer device offers a powerful computing platform at an affordable price, making it an appealing choice for engineers, enthusiasts, and hobbyists alike. It is because of its wide range of features and multiple value propositions, This single-board computer has sold around 46 million units.
In this blog post, we aim to provide you with an understanding of Raspberry Pi and Raspbian OS. Going further, we will provide a step-by-step guide to prepare sd card, installing Raspbian OS in Raspberry Pi and configuring SSH. Firstly, let's take a look at the most popular raspberry pi boards available.
Raspberry Pi Popular Models
Raspberry Pi offers various models, each tailored to different needs and requirements. Here's a brief overview of some of the most popular Raspberry Pi models:
Raspberry Pi 3 Model B/B+
Launched in 2016, the Raspberry Pi 3 models further improved upon the previous version, featuring a faster 1.2 GHz quad-core processor, built-in Wi-Fi, and Bluetooth connectivity. These enhancements made it an ideal choice for IoT (Internet of Things) projects.
Raspberry Pi 4 Model B
Introduced in 2019, the Raspberry Pi 4 is a significant leap in performance and versatility. It features a more powerful 1.5 GHz quad-core processor, options for 2GB, 4GB, or 8GB of RAM, dual 4K display support, Gigabit Ethernet, USB 3.0 ports, and USB-C power supply.
Raspberry Pi Zero/W
Released as a smaller, ultra-affordable option, the Raspberry Pi Zero (and its wireless variant, Zero W) is a compact board with a single-core 1 GHz processor, 512MB of RAM, and micro-USB and mini-HDMI ports. Due to its diminutive size and cost, it is ideal for embedded systems and projects with space constraints.
Raspberry Pi Pico
Unlike the other models, Raspberry Pi Pico is a microcontroller development board, not a single-board computer. It features a dual-core ARM Cortex-M0+ processor, 264KB of RAM, and a wide range of GPIO pins. Pico is designed for embedded projects, IoT devices, and wearables, providing a cost-effective solution for microcontroller-based applications. This guide is not applicable in the case of Raspberry Pi Pico, as it is a microcontroller and does not run Linux.
Hardware Specifications
- Raspberry Pi 4 Model B / Raspberry Pi 3 Model B+
- Micro SD Card (min 8 GB)
- 5V adapter (with a recommended current rating of 2.5A or more)
- HDMI cable(Not required for SSH)
- LCD monitor with HDMI Port (not required for ssh)
- USB keyboard
- USB mouse
Software Specification
Installing and configuring Raspbian OS on Raspberry Pi
Install Raspbian OS and configure raspberry pi using the following easy steps:
- Start by setting up your Raspberry Pi with a Raspbian operating system.
- After flashing your SD card with the latest Raspbian OS. Connect your LCD to Raspberry Pi with HDMI.
- Power Up your Raspberry Pi with a 5V adapter.
- After a few seconds, the Raspberry Pi OS desktop will appear.

configuring SSH on Raspberry Pi
Secure Shell (SSH) is a protocol that enables secure remote access to computers or servers over an unsecured network. SSH is widely used for secure remote administration, file transfer, and tunnelling applications. These features provide an added advantage to work with limited hardware. Raspberry Pi with SSH enabled doesn’t need a monitor and other peripherals like a keyboard and mouse. It just needs a stable WiFi connection and a PC
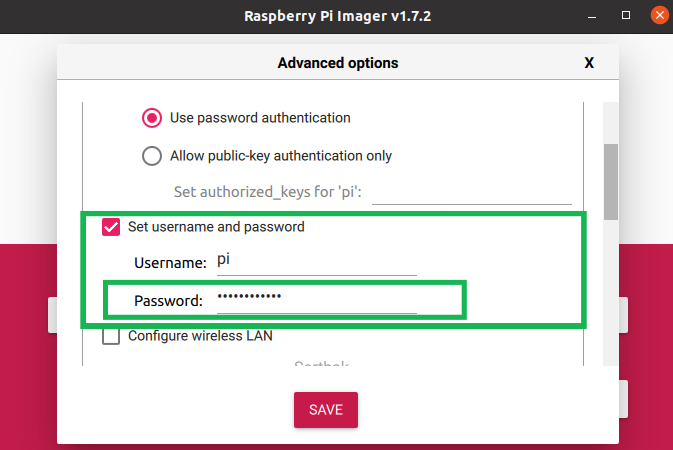
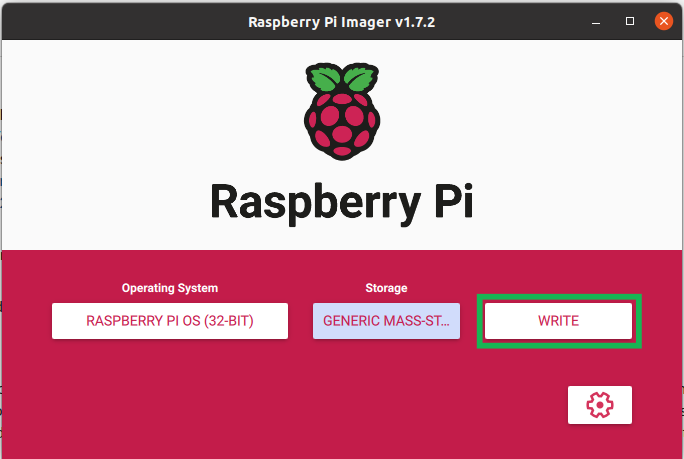
- To connect to Raspberry Pi using SSH, We need to configure Raspberry Pi setting for ssh before writing the image. For that, click on the settings button after choosing the operating system and storage.

- Then check EnableSSH checkbox

- Next, to configure a username and password for your raspberry pi, check the Set username and password checkbox and add the password of your choice.
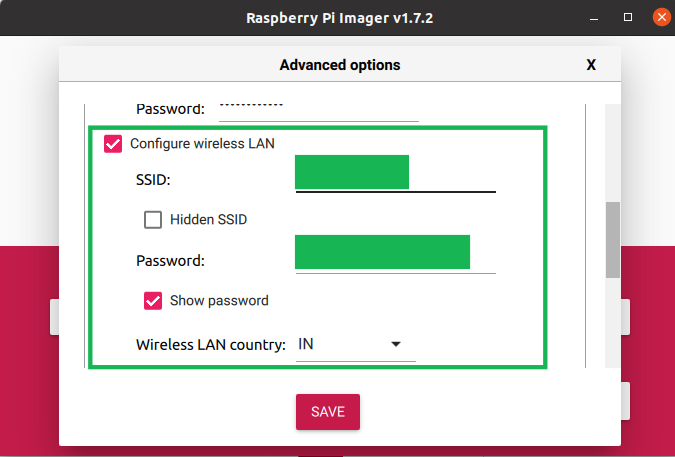
- Next, to configure SSID and password for your raspberry pi, check Configure wireless LAN checkbox.
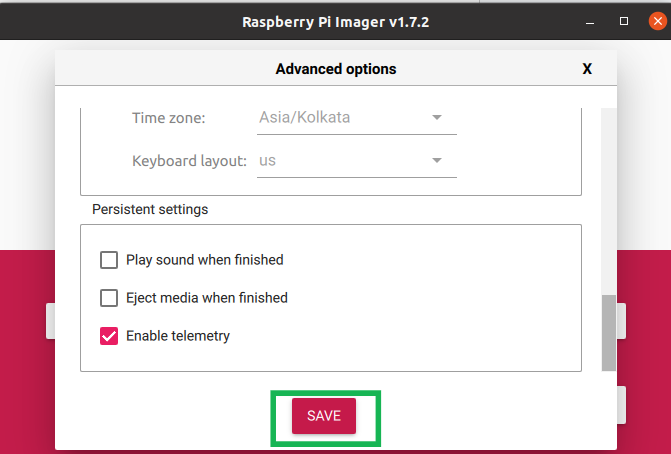
- Click on SAVE to save your settings.
- Then, click on write to WRITE image to sd card
- Open a terminal on your Raspberry Pi or connect remotely using SSH.
- To connect over SSH. Open the terminal and type the following command
ssh <username>@<ip of raspberry pi>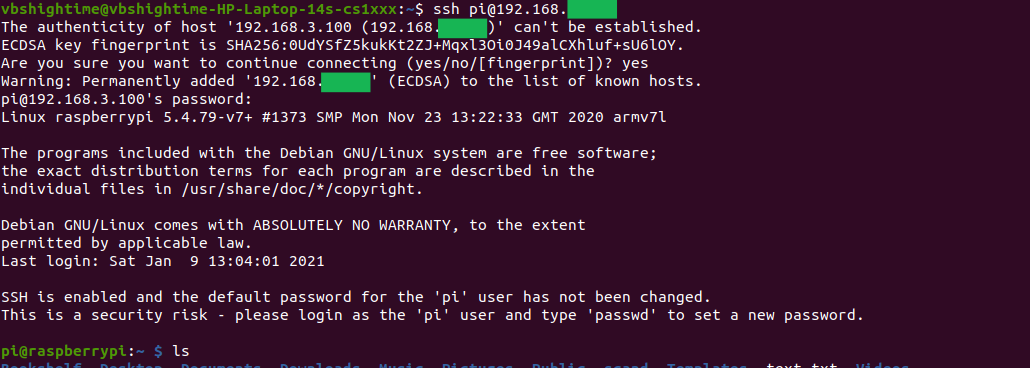
Conclusion
In this article, We set up our Raspberry Pi with Raspbian OS and configured SSH on it.
I hope you gained valuable insights from this comparison summary. As we continue to come up with more interesting tutorials and maker content, we invite you to explore Bytebeam further and see how our platform can empower your projects.
Stay Tuned!


.png)
