Getting started with MQTT on Raspberry Pi using Python
In the ever-evolving world of the Internet of Things (IoT), efficient and reliable communication between devices is paramount. One protocol that has significantly impacted the IoT landscape is MQTT (Message Queue Telemetry Transport). MQTT, a lightweight and open-source messaging protocol, has become a popular choice for connecting and exchanging data between IoT devices. Looking at the versatility of MQTT, We have compiled a detailed guide on MQTT architecture, its features and its application. Check out our “MQTT beginners guide blog” blog to get more understanding.
Our aim with this blog is to provide you with an understanding of MQTT and Raspberry Pi integration. This blog post constitutes of 2 parts. In the first part, We will walk you through the steps to install the MQTT broker on your Raspberry Pi. In the second part, We will go through the steps to connect to the broker, publish messages to a topic and subscribe to the topic. This post assumes that you have a Raspberry Pi setup with Raspbian OS.
So let’s get started.
Hardware Specifications
- Raspberry Pi 4 Model B / Raspberry Pi 3 Model B+’
- Micro SD Card (min 8 GB)
- 5V adapter (with a recommended current rating of 2.5A or more)
Installing Mosquitto MQTT Broker on Raspberry Pi
Among the various MQTT brokers available, Mosquito has gained prominence for several reasons. It is an open-source, lightweight, and easy-to-use broker, making it a popular choice for both small-scale projects and enterprise-level deployments. Mosquitto boasts robust performance and efficient resource utilization. In this section, we will install the MQTT broker on raspberry pi.
If you are new to Raspberry Pi and need guidance on setting up the Raspbian operating system, we have you covered with our detailed blog on "Setting up Raspbian OS on Raspberry Pi" [link to the blog on setting up Raspbian OS].
To set up an MQTT broker on Raspberry Pi, follow these steps:
- Open a new terminal window and install Mosquitto dependencies.
sudo apt install mosquitto mosquitto-clients- At this point, you will now have the Mosquitto MQTT broker up and running on your device. You can verify that it is installed and running by using the command below.
sudo systemctl status mosquitto
- You should see the text “active (running)” if the service has started up properly.
Setting up Python dependencies and installing MQTT Python Libraries
Follow these instructions to set up python dependencies and install MQTTlibraries:
- Update the package list by running the command: sudo apt update.
sudo apt update- Install the MQTT client library for Python by executing: sudo apt install python3-pip.
sudo apt install python3-pip.- Once the installation is complete, install the Paho MQTT library for Python by running: pip3 install paho-mqtt.
pip3 install paho-mqtt
Configuring the Raspberry Pi for MQTT communication
After installing the necessary software, you must configure your Raspberry Pi to communicate using MQTT. Here's what you need to do:
- Decide on a unique identifier for your Raspberry Pi, the client ID. This ID will differentiate your Raspberry Pi from other devices connected to the MQTT broker.
- Create and Open a new Python script or create a new file using a text editor on your Raspberry Pi.
touch pubSubPi.py
Nano pubSubPi.py - Import the required MQTT library by including the line: import paho.mqtt.client as mqtt.
Import time
import paho.mqtt.client as mqtt- Create Python objects for hostname, broker port and topic.
hostname = “<add your hostname here>”
broker_port = 1883
topic = "<add your topic name here>"
- Create a new MQTT client instance by adding the following code: client = mqtt.Client().
client = mqtt.Client()- Next, create and set MQTT callback functions for MQTT connection and subscribe
client.on_Connect = on_connect
Client.on_message = on_message
- Connect to MQTT broker using connect() api. Connect API takes 3 arguments. First is hostname (local host in our case), broker_port (1883) and keepalive (60 sec)
client.connect(hostname, broker_port, 60)Publishing Messages with Raspberry Pi
Python code to publish messages using the Paho MQTT library
To post messages using the Paho MQTT library in Python on your Raspberry Pi, follow these steps:
- Open your Python script.
nano pubSubPi.py- Replace the topic with your MQTT topic. For this tutorial, let's name it “mqtt/rpi”.
topic = "mqtt/rpi"- To publish to the topic, use publish() API. It takes the first argument as the topic name and the second argument as payload
client = mqtt.Client()
#generate a random number as message payload
message = str(random.randint(1, 100))
client.publish(topic, message)
Handling different QoS levels in message publication
MQTT allows you to specify various Quality of Service (QoS) levels for message publication. To handle different QoS levels, modify the publish.single() function call:
- By default, the QoS level is set to 0 (At most once), meaning no message delivery guarantee exists.
- To specify QoS 1 (At least once), add the qos=1 parameter in the publish() function call.
- For QoS 2 (Exactly once), use qos=2.
- For example, to publish a message with QoS 1, the modified function call would be: publish.(<topic_name>, <message>, qos=1).
client.publish(topic, message, qos=1)Testing Python application for publish
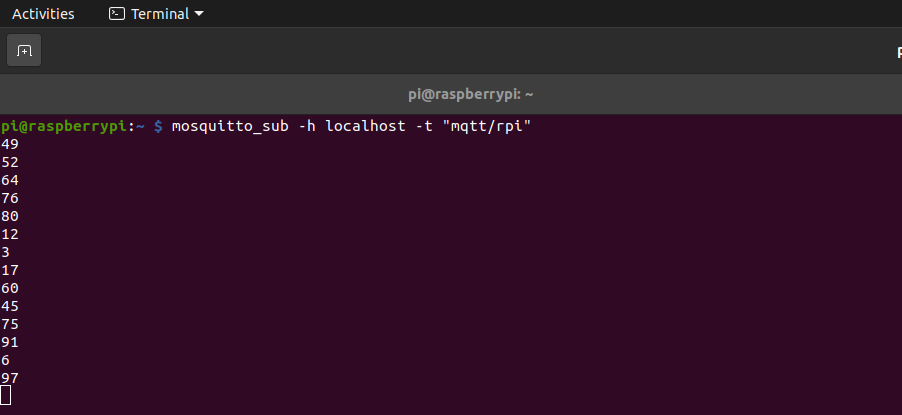
- To test the broker installation on raspberry pi, We need to run the subscriber first. In this example, we connect to a “localhost” connection and wait for messages from the broker on the “mqtt/rpi” topic.
mosquitto_sub -h localhost -t "mqtt/rpi"- Replace "broker_address" in the code from the previous section (Step 5 of Configuring the Raspberry Pi for MQTT communication) with your MQTT hostname. In our case, the hostname is “localhost”
- Run your Python application
python3 pubSubPi.py
Subscribing to MQTT Topics with Raspberry Pi
Implementing a subscriber application on Raspberry Pi
To create a subscriber application on your Raspberry Pi that can receive MQTT messages, follow these steps:
- Open your Python script
nano pubSubPi.py- Create a callback function on_connect and on_message to subscribe to the topic and to receive the message
- Subscribe to the desired MQTT topic(s) using the subscribe() method, providing the topic(s) as a parameter to receive messages from those topics.
def on_connect(client, userdata, flags, rc):
    print("Connected to MQTT broker with result code: " + str(rc))
    client.subscribe(topic)

def on_message(client, userdata, msg):
     print("Message received: " + msg.payload.decode())

client.on_connect = on_connect
Client.on_message = on_message- Start the MQTT client's network loop by calling the loop_start() method to begin receiving messages.
client.connect(broker_address, broker_port, 60)
client.loop_start()
Testing Python application for subscribe
- Now to test subscribe, run the MQTT publisher client that we installed on our Raspberry Pi earlier to publish a message to the topic.
- Run the following command to publish the message “Hello from broker” to our localhost server under the “mqtt/rpi” topic.
mosquitto_pub -h localhost -t "mqtt/rpi" -m "Hello from broker"- Run your Python application to listen to the published message
python3 pubSubPi.py

Securing MQTT Communication on Raspberry Pi
There are multiple ways secure MQTT communication like SSL/TLS-based encryption, and implementing usernames and password-based authentication keys. In this section, we will delve into these authentication and authorization methods to secure MQTT communication.
Using TLS/SSL Encryption with MQTT
SSL/TLS (Secure Sockets Layer/Transport Layer Security) is a critical security mechanism used to protect MQTT communication from potential threats and ensure data confidentiality, integrity, and authenticity.
To secure MQTT communication, we generally need the following certificates
- Server Certificate: This certificate is used by the MQTT broker to authenticate itself to connecting MQTT clients. The server certificate is issued by a trusted Certificate Authority (CA) and contains the broker's public key. The CA certificate looks like this
#ca_certificate.pem
"-----BEGINCERTIFICATE-----
***************************************************************************************************************************************************************************************************************************************************************************************************************************************************************************************Certificate content ************************************* ************************************************************************************************************************************************************************************************************************************************************************************************-----END CERTIFICATE-----\n"- Client Certificate: Optionally, MQTT clients can use client certificates to authenticate themselves to the MQTT broker. In scenarios where two-way authentication is required, clients present their client certificates during the SSL/TLS handshake.
#client_certificate.pem
"-----BEGIN CERTIFICATE -----
***************************************************************************************************************************************************************************************************************************************************************************************************************************************************************************************Certificate content *************************************  ************************************************************************************************************************************************************************************************************************************************************************************************-----END CERTIFICATE-----\n"
#private_key.pem
"-----BEGIN RSA PRIVATE KEY-----
***************************************************************************************************************************************************************************************************************************************************************************************************************************************************************************************Certificate content ************************************* ************************************************************************************************************************************************-----BEGIN RSA PRIVATE KEY-----"Password-based Authentication
Password-based authentication in MQTT involves using a username and password to authenticate MQTT clients when connecting to the broker. During the MQTT handshake process, clients provide their credentials to the broker, which verifies them against its internal user database. This mechanism enhances MQTT security, allowing only authorized clients to access the broker's services and publish/subscribe to specific topics. However, password-based authentication is less secure than certificate-based authentication since passwords are transmitted in plaintext. To bolster security, it is recommended to use TLS/SSL encryption alongside username-password authentication to protect sensitive credentials from eavesdropping and unauthorized access.
Conclusion
In this article, we explained MQTT concepts in detail. We discussed the setup process and the fundamentals of MQTT communication. We created a simple Python application on Raspberry Pi to establish communication using the MQTT protocol.
I hope you gained valuable insights from this comparison summary. As we continue to come up with more interesting tutorials and maker content, we invite you to explore Bytebeam further and see how our platform can empower your projects.
Stay Tuned!


